Cerner
Millennium:
Discern
Explorer 1
Discern
Visual Developer Practice Activities
©Cerner Corporation. All rights reserved. This document
contains confidential information that may not be reproduced or transmitted
without the express written consent of Cerner.
Contents
Creating an
Executable Program
Using DVDev's
Tables/Fields tab
Using Concat
and Trim Functions
Using
Date/Time Qualifications
Using Between
in Qualifications
Creating
Multiple Qualifications
Making a
Qualification Portable - Qualify on Males
Troubleshooting
the UAR_GET_CODE_BY()
Making a
Qualification Portable – Qualify on an Order
Qualify on
Coded Fields, Joining Two Tables
Qualify on
Coded Fields, Joining Three Tables
Introduction
Welcome
Welcome to Discern Explorer.
This course is designed to introduce you to the Discern Explorer language.
The course contains several demonstrations to assist you in becoming familiar
with the various concepts around creating Discern Explorer queries. You
also will have the opportunity to apply the knowledge you learn by creating
practice queries in the environment of your choosing.
Course Objectives
At the end of this course,
participants will be able to:
·
Describe the three main components of the Cerner
Millennium system.
·
Describe how data is organized in tables.
·
Describe how the four common transactions (admissions,
orders, results, and discharges) are handled by the system.
·
Describe how data is retrieved from the database.
·
List required elements of the basic SELECT statement.
·
Describe the three methods to be used in identifying fields.
·
Use the Data Dictionary tools to identify tables and fields.
·
Describe the three display options for field formats.
·
Format a field.
·
Describe how the system stores data as code values.
·
Use the CNVTAGE, CONCAT, TRIM, and EVALUATE functions.
·
Use indexes to create qualifications.
·
Use date and time qualifications with different operators.
·
Build a query that includes a join and a qualification.
·
Qualify on coded fields while joining tables.
·
Create sorts and sub sorts.
·
Build a prompt.
·
Build a report using Discern Explorer.
Getting Started
You will need access to a Cerner
Millennium environment to complete the following practice activities. It is
recommended that the environment have at least the Cerner STANDARD database
installed.
Clients:
Clients should use a client Build,
Certification, or Training environment to do the assigned practice
activities. Use caution if you must work in a production environment. Set the maximum number
of records returned at a low number to avoid large queries that might slow the
system.
For further questions, email
cliented@cerner.com. Global clients should contact: uklearningservices@cerner.com
Cerner Associates:
Cerner Associates can use the
internal Play Environments Cerner
Millennium which is maintained by Cerner's GRID team, or other domains in
which access is supplied.
Note that the steps in this document
follow the 2015.01.01 code release.
You can print this participant guide
or toggle between the document and the environment.
This participant guide includes the
practice activities for the Discern Explorer course, focusing on the
Discern Visual Developer application. Note that you will be asked to enter data
into the code editor. Do not copy and paste from this guide as you likely will
receive errors.
Performance Check
The goal of this course is to teach
the Discern Explorer programming
language. The Performance Check will evaluate your understanding of the Discern Explorer language. In the
assessment, you will be asked to evaluate syntax examples and select the
correct option; therefore, pay special attention to the format of the
syntax as you create your queries throughout this course.
Return to the Table of Contents and
click on the topic Discern Explorer
Foundations.
Building Queries
Running an Ad Hoc Query
In this practice activity, you will
build an ad hoc query using the three required elements of the SELECT command.
You will use the Discern Visual Developer (DVDev) application. Using DVDev, you
will create an ad hoc query using two methods: manually typing the commands and
using Query Builder.
1. Open
Discern Visual Developer. You can
use any environment to which you have access. If you currently have an
environment installed on your computer, double-click DiscernVisualDeveloper.exe
from the network or the local install directory. The local install directory
commonly is located under Program Files > Cerner (C:\Program Files\Cerner).
Use the log on, password and domain name appropriate to that environment.
Cerner associates can
use the internal Play environment, which is a domain maintained by Cerner's
GRID team. Note: Cerner clients will not be able to access the Play environment as
it is an internal domain.
a) Click
PLAY
Environment Access. Note the username and password.
b) Click
CONNECT to connect to the Play
Environment through virtual desktop.
e)
Double-click the "Millennium Applications" folder on the
desktop.
f) Double-click
DiscernVisualDeveloper.exe.
g) Log
on with the username and the password as listed in the Play Environments page.
h) The
Play environment is refreshed every Friday evening which means all files
created throughout the week are deleted. For any files you want to save for
future should be saved to your local device or to a network share, either by
copy/paste or using the Export and providing the path to a Cerner network
drive.
Cerner Clients
must be granted access to a non-production domain that is internal to the
client's organization in order to complete the necessary activities. Work with your internal system administrator
to get access to an internal client domain. Note: Cerner clients will not be able to access the Play environment as
it is a domain internal to Cerner.
2. You
are prompted for a user name and password. User names and passwords are
specific to each user and are the basis for Cerner security. Enter your user name and password and click OK.
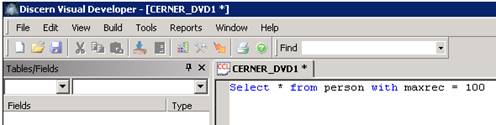
3. You
want to run a simple query to get the PERSON_ID for the first 100 people in the
system. First, you need to start a new file. From the File menu, select New.
4.
Make sure that Blank
is selected in the File Type list and click OK.

5. Type the
following SELECT statement in the code editor. The asterisk, or wildcard, is
used to tell the system to bring back all columns from the table. Enter:
SELECT
* FROM PERSON WITH MAXREC = 100
Note:
It does not matter if you use uppercase, lowercase or a
combination.
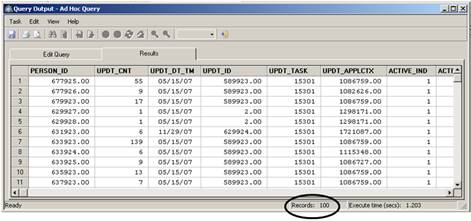
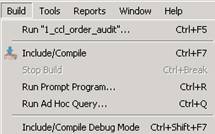
6. To
run the query, from the Build menu, select Run
Ad Hoc Query. The following screen is a sample of results received from the
query. Your results will have the same column headings, but not the same data.
The output of the query commands display in a spreadsheet-like grid and
returned only 100 rows. The Maxrec=100
control option limited the results to return only 100 rows.
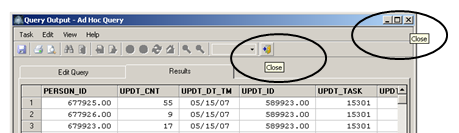
7.
Review the results. When you finish, close the Output window by clicking
either Close as shown below.
8. Next, you will build an ad hoc query
using a second method and allow the Query Builder to build the query for you.
First, place a semi-colon (;)
in front of the SELECT command to comment out the query. When you place a
comment, the editor changes the text color to indicate that the commands are
comments and are not meant to be executed.

9.
Click after the query and press ENTER
two times. From the Tools menu select Query
Builder.
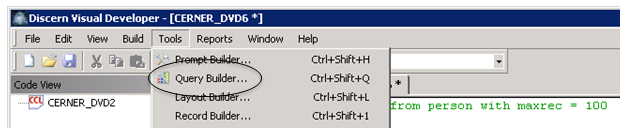
You can also access the Query
Builder by using the query builder icon or by pressing CTRL+SHIFT+Q.
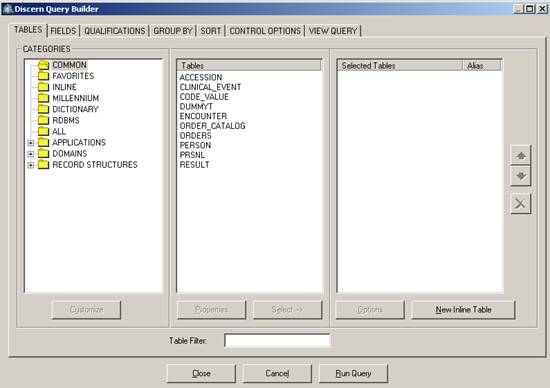
10. The Discern Query Builder opens:

The Query Builder is used to create and
modify queries. The TABLES tab is
used to select the tables that contain the data you need for your query. You
will learn all of the different aspects of each tab as you move through this
course. For now, follow the directions to create a simple query. In the Tables
list, double-click PERSON to select
that table. You also can select the table from the Tables list and click Select.

11. Notice that an alias of P is automatically assigned to the PERSON
table. Aliases define an abbreviation for a table. Aliases are assigned in the
FROM clause immediately following the table name. By using the alias assigned
to the table, you no longer need to refer to the whole table name when
referring to a field from that table. For example, instead of PERSON.PERSON_ID, you can refer to the
field by the alias, P.PERSON_ID.
Click the FIELDS tab. To extract all
fields from the table into the query, click Select All Fields.
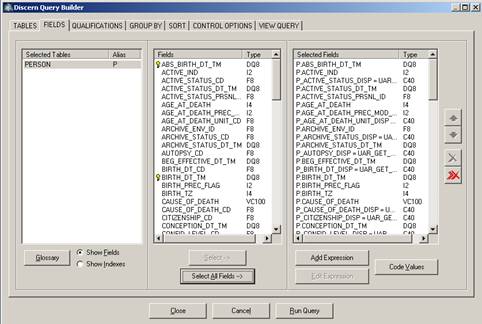
12. Click Yes to confirm that you want to select all fields. All of the
available fields for the PERSON table are placed into the Selected Fields
section.
13. Notice that the alias of
"P" is placed in front of each field in the Selected Fields list.
When you have fields from multiple tables, the alias helps you quickly identify
to which table the field belongs. To view the syntax for the query, click the VIEW QUERY tab and scroll through the
query that the Query Builder has created. The SELECT command and all of the
fields listed were created when you selected all fields on the FIELDS tab. Notice the syntax for
listing the fields requires that a comma be placed between each of the fields
being displayed. The FROM PERSON P statement was created by selecting the
PERSON table in the TABLES tab.
14. Click the CONTROL OPTIONS tab and
enter 100 in the Max Records:
option.

It is a good idea to limit the
amount of data returned while you are building and testing queries to avoid
large queries that might slow system performance.
15. Click Run Query. Review the results. The results should be the same data
returned from your original query. When you finish reviewing the results, close
the Output window.
16. Click Close to close the Query Builder.
17. The query created by the Query
Builder is written to the source file. Scroll to the bottom of the query and
examine the WITH clause. You need to add
the MAXREC control option to specify that you only want 100 rows returned. At the end of the WITH clause type a comma(,) MAXREC = 100.
Your WITH clause should look similar to:
WITH
NOCOUNTER, SEPARATOR=" ", FORMAT, MAXREC = 100
18.
From the Build menu, select Run Ad Hoc
Query to execute the ad hoc query from the source file.
19. Review the results and close the Output
window. Remove the semi-colon in front
of the first SELECT command. Now you
have two ad hoc queries in the source file.
20.
You can execute either query. Click the
word SELECT from the first query. To
execute the query, press Ctrl+q (or
select Ad Hoc Query in the File).
21.
Close the Output window and click on the word SELECT from the second query.
To execute the query, press Ctrl+q
(or select Ad Hoc Query in the File).
22.
Close the Output window.
23. Close the source file that contains the
queries by clicking the Close Window
icon in the upper-right corner.

24. You will receive a message asking
you if you want to save.
Since this is an ad hoc query that
you do not need to save, click No.
The queries were not saved and not available
for you to run later. These queries were simple and not time consuming to
create, however, if it is helpful, you can place commonly used queries in a
file that can be saved and accessed at a later time. For example, if you use
the same query for troubleshooting or validating information, and know you will
run it frequently, you can save the queries in a file.
Continue to the next practice
activity, Creating a Command File, to
create and save a file that contains queries.
Creating a Command File
A command file is file that can
store queries and commands that you may need to access and execute for simple
troubleshooting or auditing purposes. If
you find that you are retyping the same commands or queries frequently, place
the commands in a file to access and execute when needed.
1 In Discern Visual Developer, from the File
menu, select New. The New dialog box
opens.
2. Select
Blank and click OK.
3. To
save the file, from the File menu, select Save.
The Save as Host Source dialog box opens.
4 In the Logical/Path box enter CCLUSERDIR:.
The CCLUSERDIR directory is the default directory in Discern Explorer
where all files are placed unless you specify otherwise.
5. In
the File Name box, enter 1_<your initials>_CMDFILE.PRG,
such as, 1_CCL_CMDFILE.PRG.
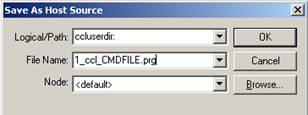
Note: The Node value is <default>. On a
UNIX system, a *.prg is saved on ALL nodes. All other extensions, for
example .ccl, are saved on only one node.
6. Click
OK.
7. Create
a simple query that returns the highest PERSON_ID from the PERSON table. Your query should be similar to the
following:
SELECT MAX(PERSON_ID) FROM PERSON
8. Create another query that returns the total
number of rows on the PERSON table. Your
query should be similar to the following:
SELECT COUNT(*) FROM PERSON
9. Click
anywhere inside the first query and from the Build menu, select Run Ad Hoc Query or Ctrl+q.
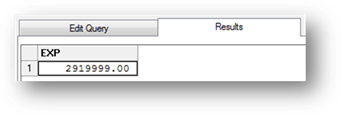
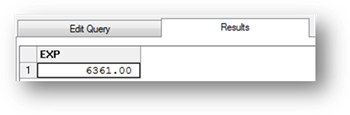
The
result of the query is displayed. The output of this query returns one row with
one value that displays the highest PERSON_ID on the PERSON table. The following is an example of the
output. The PERSON_ID returned by your
query will most likely be different.
10. Close
the Output window. Click anywhere inside the second query. From the Build menu, select Run Ad Hoc Query or press CTRL+Q.
The output of this query returns one row with one value that displays
the total number of rows on the PERSON table.
The following is an example of the output. The number returned by your query will most
likely be different.
11.
Close the Output window.
Now that the query is in a file, you
can open it, edit it, and execute the commands as you need.
12. Close
the file by selecting Close from the
File menu or by clicking the X in
the upper-right corner. If
prompted, save the program.
13. Say you decide you want to add a query to
return the PERSON_ID and the Name_Full_Formatted. First, you need to open the file. Click the
Open toolbar button ![]() .
.
14. In
the Open Host Source dialog box, enter CCLUSERDIR: in the Logical/Path
box.
15. Enter
the file name, 1_<your initials>_CMDFILE.PRG, in the File Name
box.
16.
Deselect the Read Only option so you can edit the
file and click OK.
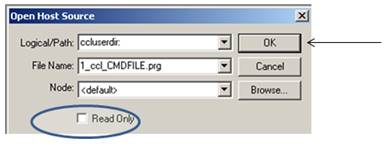
Your
query is displayed in the code editor section.
17. You want to add a query to your
source file so that you have a query that returns the PERSON_ID and the
Name_Full_Formatted from the PERSON table. In the code editor, enter the
following query as the third query in your source file as shown in the
following display:
SELECT
PERSON_ID, NAME_FULL_FORMATTED
FROM
PERSON
WITH
MAXREC=100
18. Click
anywhere in the third query and execute the query.
19. Review the output. Note that only
two columns are displayed, PERSON_ID and NAME_FULL_FORMATTED. The items used in the SELECT list are used as
the title for each column. The data you
see will be different due to different domains; however, the format should be
similar.
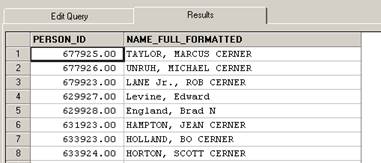
When you are finished, close the
Output window.
20. Close the source code file.
21. Click Yes to save your updates.
You
have completed the activities for the Building Queries topic. Return back to
the Table of Contents of the WBT and click on the topic Creating an Executable Program.
Creating an Executable Program
In this practice activity you will
create an executable program.
1. Open
Discern Visual Developer.
2. Before
you begin creating an executable program, it is important to know the group
your user_id has been assigned to. Groups provide security for programs. When
an object is created, the object is stored in the object library with the
assigned group level of the user that included the program. To execute that
program, the proper group level might need to be appended to the object name.
To learn details about how groups provide security, refer to the Discern Explorer Security Groups help
topic: https://wiki.ucern.com/display/public/1101discernHP/Discern+Explorer+Security+Groups+using+Discern+Explorer
3. To identify your group, from the
Build menu, select Run Prompt Program.
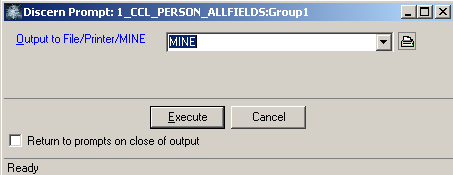
4. In the Run Prompt Program dialog box, enter
CCLUAF in the Program to Run box, and click Run.
5. In the Mine/CRT/printer/file: prompt, enter MINE as the output
device. Click Execute.
6. Look
for your user ID in the Output window. If you find your user ID, write
down that you are Group 0. If you do not find your name, write down that you
are Group 1. This information is needed later in this activity.
7. Close
the Output window.
8. In
preparing to create a new executable program, make sure the object name you
want to use isn’t already in use. Plan
to name the object 1_<your_initials>_PERSON_ALLFIELDS.
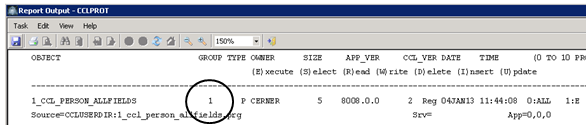
Begin by running CCLPROT to make sure the object name is unique. From the
Reports menu, select CCLPROT. The Discern Prompt: CCLPROT window opens
similar to the following:
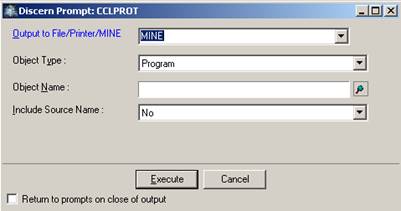
a) In
the Output to File/Printer/MINE box, keep the default value of MINE.
b) In the Object Type box, keep the default
value of Program. The Object Type box narrows the search to a
specific type of object. Most of the
time, you will leave the default value of Program, however searching for other
object types is sometimes helpful.
c) In the Object Name box, enter 1_<your initials>_PERSON_ALL_FIELDS and
click Execute (or click anywhere outside of current
box). When you click Execute, a program checks the object
library for the existence of the name in the object library. If a match is found, the program allows you
to continue to populate the next prompt.
If a match is not found, the Object
Name box turns red. This indicates that
the object is not found, and the name is unique and is available to use.
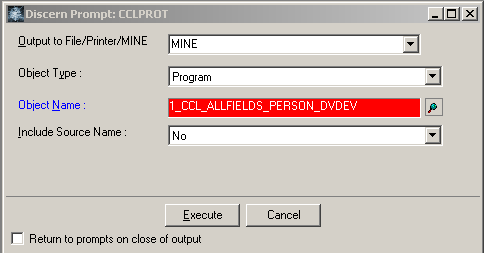
d)
The Include Source Name, Yes or No is used to indicate if you want the
source code location included in the report. Since our object has not yet been
created, we do not need to use this parameter.
Click CANCEL to exit the
Discern Prompt: CCLPROT dialog box.
Note:
In this course, you are given a naming convention where the file name starts
with 1_. When you create programs, it is recommended that clients name all of
the custom objects beginning with a number. For example: 123_PERSON_ALLFIELDS.
This naming convention prevents you from accidentally overwriting object names.
If client custom programs begin with a number, and Cerner production programs
begin with a letter, the possibility of a new Cerner program overwriting an
existing custom program or a custom program overwriting an existing Cerner
program is eliminated. Using CCLPROT to check for an existing object name
eliminates the possibility that you accidentally overwrite an existing Cerner
program, but it does not prevent a future Cerner program from overwriting a
client custom program.
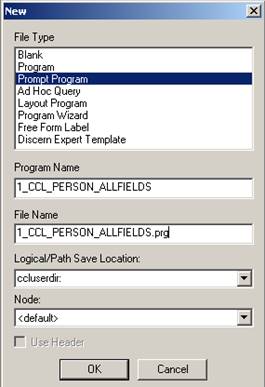
9. Click
the New toolbar button ![]() to begin creating your program. The New
dialog box opens.
to begin creating your program. The New
dialog box opens.
10. From the File Type list, select Prompt Program. In the Program Name
box, enter 1_<your initials >_PERSON_ALLFIELDS or another unique
name. Be sure to keep track of your file names as you will open and edit
several files in later exercises. In the Logical/Path Save Location: box, enter
CCLUSERDIR:. The CCLUSERDIR:
directory is the default directory in Discern Explorer where all files
are placed unless you specify otherwise.
Note: The Node
value is <default>. On a UNIX
system, a *.prg is saved on ALL nodes.
All other extensions, for example .ccl, are saved on only one node.
11. The entered program name is the
object name used in the Drop Program Go and Create Program …End commands.
Notice that the File Name box automatically is populated with the same name and
the .prg extension. Click OK.
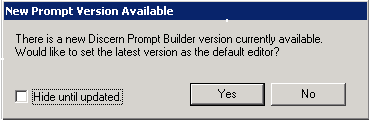
12.
If a New Prompt Version Available box opens with the following message: Click Yes.
13. The Discern Prompt Builder dialog
box is displayed. Click Save to
accept the default prompt. Prompts will be discussed in more detail later in
this course.
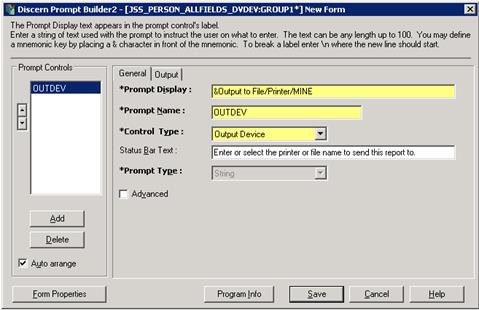
14. Another
message is displayed:
Click Yes. The Drop Program Go and Create
Program commands automatically have been inserted in the file with the object
name you entered in the Program Name box.
The Prompt command has been populated with the values entered in Discern
Prompt Builder dialog box.

15. At this point, it is a good idea to
include comments to be saved with the file. Comments provide vital information
about the intended purpose of the program. This is especially helpful for other
people who need to access and modify the program. Comments about the program typically are
placed at the top of the source file.
In the source code file, click
before the first word (DROP) in the code editor, and press ENTER twice.
16. Comments containing multiple lines
should be preceded with a forward slash and an asterisk (/*) and ended with an asterisk and a forward slash (*/).
Enter the forward slash and asterisk (/*) to begin your comments.
17. Recommended comments include the
program's purpose, the owner's name, the creation date, and any update
information. Click in the first blank row and add comments similar to the
following:
/* Name: CCL Smith
Purpose of Report: A query that displays all of fields from
the PERSON table. */
You also can comment lines of text by
placing a semicolon (;) or an exclamation (!) in front the line you want
commented. Anything to right of the symbol (; or !) is ignored when the file is
included. The following lines of code are comments only:
;
Name: CCL Smith
! Date created: 12/22/2014
18.
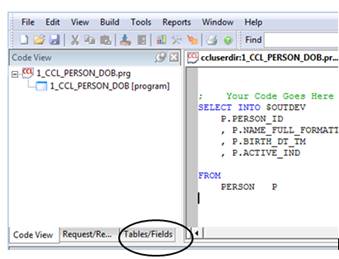
You are ready to create the query. Click the Tables/Fields tab in lower left-side pane.
19. The first step is to select the
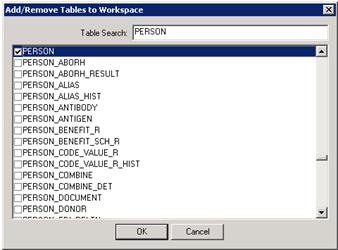
table you want to use. From the View menu, select Add/Remove > Tables. A system message "Loading
Table Data"
is displayed briefly before the Add/Remove Tables to Workspace dialog box opens.
20. Enter PERSON in the Table
Search box.
21. The system displays tables that
match your search criteria at the top of the list. Select the PERSON table option and click OK.
22.
The PERSON table is listed in the second box just above the Fields
list. The fields associated with the PERSON table are listed in the Fields
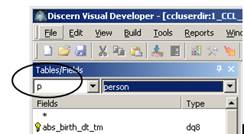
list. Next, you need to assign an alias to PERSON table. Enter P in the
first box above the Fields list.
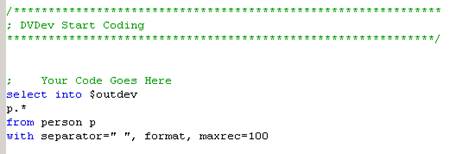
23. In the code editor window under the
comment that says Your Code Goes Here,
type the following query that selects all fields from the PERSON table and make
sure to limit the number of rows returned to 100:
SELECT
P.*
FROM
PERSON P
WITH SEPARATOR=" ",
FORMAT, MAXREC=100
The
MAXREC option limits the number of rows being extracted. The FORMAT option
makes the results readable when running through a server; otherwise, the data
is unreadable. The SEPARATOR option adds a space between the columns to parse
the results properly for display.
24. When
this file was created, you selected the prompt program file type. The first
prompt was created for you automatically. When the program is executed, the
prompt asks the user if the results from the query should go to the displayer,
a file, or a printer. To complete the prompt, you have to accept what the user
passes from the prompt to the query.
Type INTO $OUTDEV to the
right of the SELECT command.
The code in your source code file
should look similar to the following:
25. It is time to compile your code to create
the object. To compile your source code, you can select Include/Compile from the Build menu, click the Include/Compile
icon, or press CTRL+F7.
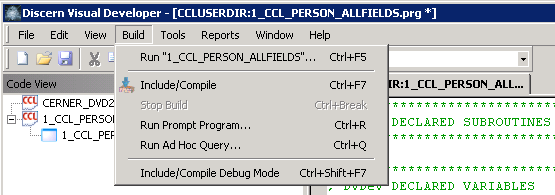
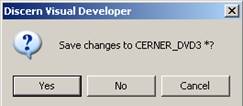
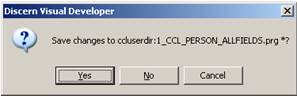
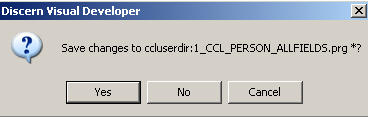
26. Click Yes to the save changes message:
Notice when the compiler finishes
translating the code to binary, information appears in the Output window at the
bottom of the application. The following
is an example of the messages:

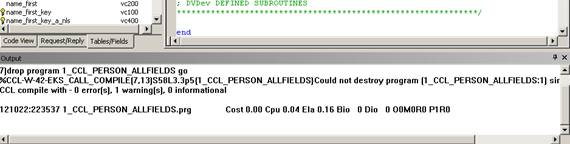
The message references the number of
errors, warnings and informational messages.
The %CCL-W-42 Could not destroy program
since it was not found in the object lib is only a warning. When the Drop
command was executed, it could not find the object in the object library,
because the program had not been included before. This warning is not displayed
when you run this program again because when it executes the Drop command, the
object is in the library to drop. If you do not receive the warning message,
the object already existed in the object library.
If you received a %-CCL-E, this
indicates a compile error. Review the
previous steps and validate the syntax is correct. Once you find and fix any
syntax problem, click the Include/Compile
button again until 0 errors are noted in the Output section.
Once 0 errors are achieved, an
object has successfully been created and added to the object library. The program is ready to be executed.
27.
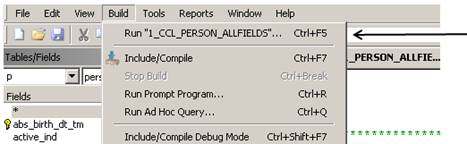
From the Build menu, select the first Run option.
The Discern Prompt dialog box opens
similar to the following:
![]()
If the user who compiled the program
is a Group 1 according to Discern
Explorer; the Group1 is appended
to the end of the object name. If the user is a group 0 according to Discern Explorer, then nothing is
appended to the end of the object name.
One way to figure out if your username is a group 0 is to execute the
utility program CCLUAF. If the user name is on the list, then the user is a
group 0, otherwise the user is a group 1.
Another way to tell your group level
is to execute CCLPROT on the object you just created. In the second column of the report, under the
User column, you will see a 1 or a 0.
Throughout
this course, any time you enter an object name to execute a program, you must
add the :Group1 extension if the
username you use to compile and create objects is a Group 1.
28. Keep MINE as the default value for the first prompt to indicate you want
to the results to be returned to the screen and click Execute.
29. The results are displayed in the
Output window. The column headings in your result set will be the same as the
following; however, your data will be different.
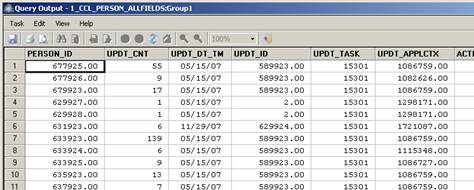
30. Close the Output window.
31. From the File menu, click Save or use the Save toolbar button![]() . Since you are finished with this program for
now, close the file.
. Since you are finished with this program for
now, close the file.
You have completed the activities
for the Creating an Executable Program topic. Return to the Table of Contents
of the WBT and click on the topic, Identifying
Tables and Fields.
Identifying Tables and Fields
Using the Data Dictionary
Discern Visual Developer (DVDev) provides
you with several tools to help identify the tables and fields needed for
queries.
In this practice activity, you will
use the various tools contained within DVDev to collect information about
people associated with the hospital. For example, name, identification number,
birth date, the last time an individual’s record was updated, and whether the
record is in an active status.
Using Query Builder
1. Before
you begin building this query, select a name for the source code file and the
object. You decide to use the object name of 1_ <your
initials>_PERSON_DOB. Execute CCLPROT
to ensure you do not overwrite an existing object with the same name. From the
Reports menu, select CCLPROT. The Discern Prompt: CCLPROT window opens.
a)
In the
Output to File/Printer/MINE box, keep the default value of MINE.
b)
In the Object Type box, keep the default
value of Program. The Object Type
box narrows the search to a specific type of object.
c)
In the Object Name box, enter 1_<your initials >_PERSON_DOB, and click Execute. If CCLPROT finds a
match, a report displays information about that object. If this is the case, select a new name, and
run CCLPROT again until you find a unique name.
When you find an object name that is
not already in use, the Object Name box fills in with the color red.
d)
The Include Source Name option of Yes
or No, is used to indicate if you
want the source code location included in the report. Since our object has not
yet been created, we do not need to use this parameter. Click CANCEL
to exit the Discern Prompt: CCLPROT dialog box.name.
2. To
begin creating your new program, click the New
toolbar button ![]() .
.
3. Select
Prompt Program for the File Type.
4. In the
Program Name box, enter 1_<your initials >_PERSON_DOB, or another unique name.
Notice the File Name is automatically populated with the same name you entered
in the Program name box. It is saved with the .prg extension. Click OK.
5. The
Discern Prompt Builder displays with the first prompt created for you. Click Save. This creates a prompt that allows
the user to direct where the result set should go when the program is executed.
The default value of MINE allows the result set to display to the screen. The
user could choose to change MINE to something else like a file name, which
would redirect the output directly to a file when the program runs.
6. A message displays asking if you want to save
changes. Click Yes.
Use the Query Builder to create this
query. When you use the Query Builder, a
Select statement is added automatically at the position your cursor is located
within the code editor. To place the Select statement in the correct
location, click under the comment that says, Your Code Goes Here.
 .
.
7.
Open the Query Builder using the toolbar button:

8. The Discern Query Builder window
opens similar to the following:
The first data dictionary tool is
the CATEGORIES list in the TABLES
tab. The various folders contain logical groups of tables.
The COMMON folder contains a list of
commonly-used tables and is selected by default.
9. Click
the FAVORITES folder. This folder is most likely empty and remains so until you
decide which tables to add to this folder.
Within the TABLES section of the Categories pane, Right-click and select
Customize or click Customize at the bottom of the
Categories pane. The Customize Favorites
dialog box opens. Select PERSON from the Available Tables and
click Add to add your frequently
used tables to the Favorites folder. Click OK
to close the Customize Favorites window.
10. Click the INLINE folder. This folder is most
likely empty and remains empty until an inline table is created. This category
allows for the creation of inline tables, which are temporary result sets that
can be helpful to use in qualifications.
11. Click the MILLENNIUM folder. This folder
contains all tables in Cerner Millennium.
12. Click
the DICTIONARY folder. This folder
contains a list of system, or reference tables used by Cerner Millennium.
13. Click
the RDBMS folder. This folder contains a list of system or reference tables
used by the relational database management system (RDBMS). A relational
database management lets you create, update, and administer a relational
database. Commonly used RDBMS products are Oracle,
IBM's DB2,
and Microsoft's SQL Server.
14. Click
the ALL folder. This folder contains a full list of all tables in the entire
system.
15. Click
the plus sign next to the APPLICATIONS folder to expand it. This folder
contains groupings by solutions. Click the RadNet
folder under the Applications folder. All tables associated to the Radiology
solution are listed. If you need to write a Radiology report, you might
research the tables listed in this section.
16. Double-click APPLICATION folder or
click the minus sign to close the folder.
17.
Click the DOMAINS folder. This
folder displays tables from a broader spectrum of the data model. For example,
one of the folders is PERSON. Person information and all the tables that relate
to the PERSON data model, spans multiple solutions and cannot be placed in any
on Application or solution.
18. Click
the RECORD STRUCTURE folder. This folder contains system or user defined record
structures. Record Structures are in memory structures for temporarily storing
data.
19. Find the table called MAMMO_FIND_DETAIL by
typing in MAMMO in the Table Filter.
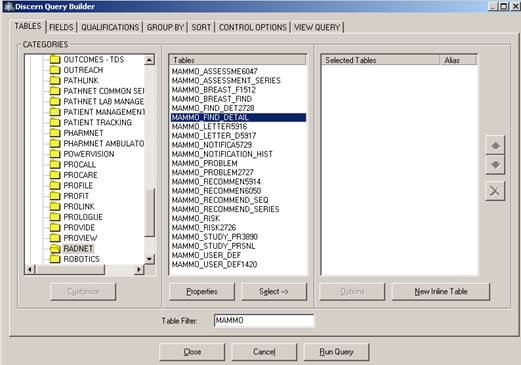
Using the Table Filter helps you to
get to specific tables in the list quickly.
You can also scroll through the list to look at all of the tables for
that category.
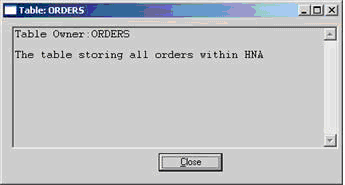
20. Right-click on the table MAMMO_FIND_DETAIL and access the Properties. Read the DESCRIPTION for the table and then
click Close. You can use the
Properties to access glossary information about tables to help you research
what kind of data resides in that table. Delete the word MAMMO in the Table Filter.
21. Double-click
Applications folder or select the minus sign to close the folder.
22. Click the DOMAINS folder. This
folder displays sub-categories from a broad spectrum of the data model. Click the PERSON category and note all of the tables that are a part of the
PERSON data model. Person information
and all the tables that relate to the Person data model span multiple solutions
and cannot be placed in any one Application or solution list.
23.
Click the RECORD STRUCTURES folder. This folder is most likely empty until you
create a record structure. Record
Structures are in memory structures for temporarily storing data.
24. Click the MILLENNIUM folder and
enter PERS in the Table Filter box.
Notice tables starting with PERS appear in the list.
25. Right-click PERSON and select Properties.
The Table window provides a brief description of the owner and the purpose of a
table. Click Close.
26. Double-click the PERSON table to select it. When you
select this table, the Query Builder automatically builds the FROM clause for
the SELECT command that looks similar to:
FROM
PERSON P
27. Click the VIEW QUERY tab. Identify the
FROM clause that has been added.
28. Click the FIELDS
tab.
29. The Glossary provides a description
of each field in the selected table, in this case, the PERSON table. Click Glossary.
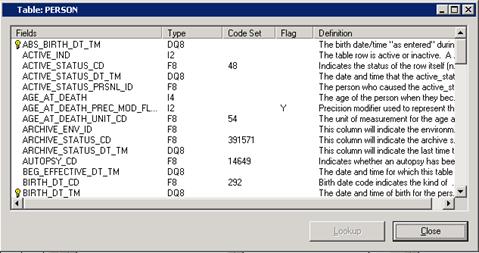
30. In addition to the field
description, the data Type, and if applicable, the Code Set number are
displayed. Scroll down to view more of
the glossary. The Glossary is a valuable resource in determining the fields
needed to display in your queries and reports.
31. Click Close to return to the FIELDS
tab window.
32. Select the fields for the query by
double-clicking the following fields in the FIELDS list to include them in your
report.
· ACTIVE_IND
· BIRTH_DT_TM
· NAME_FULL_FORMATTED
· PERSON_ID
33. The order of the fields in the
selection list determines the sequence that the columns are displayed in the
output. You need to move the PERSON_ID and NAME_FULL_FORMATTED field so they
are listed first. Select each of the fields from the Selected Fields list and
click the Move Up button.
34.
When you select items for display from the Fields list, the fields are placed
under the SELECT command and separated by commas. Click the VIEW QUERY tab and review the structure of the query that is being
created by the Query Builder. Validate
the fields are separated by commas.
35. Click Run
Query to execute the query and display the results.
36. A
Confirm prompt is displayed: Control option MAXREC is not found. Do you want to add MAXREC = 100 to the query?
Click Yes to set
the maximum number of records to 100.
Note:
The maximum number of records is set only while you are in the Query Builder.
The MAXREC code will not be added to the code editor when you exit the Query
Builder.
37. The
Output window opens. Review
your query results and close the Output window.
38. Click Close to exit the Query Builder. Notice the query has been placed
in the source code file for you.
39. You have created a basic ad hoc
query that fulfills the basic requirements for a simple query. The ad hoc query can be executed using Run
Query from query builder or executed as an ad hoc query. Click anywhere inside the query and from the
Build menu, select Run Ad Hoc Query
(or press CTRL + Q).
40. Close the Output window. You want to use this query as a part of an
executable program so you can create an object yes can be executed on demand.
In order to make this executable program complete, you need to add a couple of
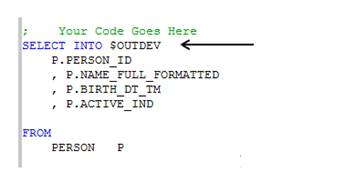
more commands to the source file. Immediately after the SELECT command,
enter INTO $OUTDEV.
This allows the query to accept information provided by the user at the prompt.
41. The Query Builder does not add the
MAXREC control option to the source code when you exit the Query Builder. If
you want to limit the data returned, you need to add the command manually. At
the end of the WITH clause, enter a comma, and then MAXREC = 100. The WITH clause line of code will look like:
WITH
NOCOUNTER, SEPARATOR=" ", FORMAT, MAXREC = 100
42. From the Build menu, select Include/Compile to create the object.
43. Click Yes to save changes. Notice the messages in the Output section of
the window. You will see the following warning:
%CCL-W-42
Could not destroy program (1_<your
initials >_PERSON_DOB) since it was not found in the object lib. CCL
compile with – 0 error(s), 1 warning(s), 0 informational
This is a warning, not an error.
When the DROP command was executed, it could not find the object in the library
because it had not been included in the library before. The warning is not
displayed when you run this program again because when it hits the DROP
command, the object will be in the library to drop.
44. From the Build menu, select the
first Run option that automatically
populates the object name to execute, for example, from the Build menu
select Run > 1_CCL_PERSON_DOB.
Earlier,
you wrote down the group number associated to the username you used to log in
to the application, such as Group 0 or Group1. If your username is a Group 1,
the :GROUP1 must be appended to the
end of the object e name. Using the
first Run option from the Build menu appends the group level for you. For
example: 1_CCL_PERSON_DOB:GROUP1
45. Click Execute. Since you want the
result set to display, keep MINE as the output device.
46. Review the data. When you are
finished, close the Output window, save the file and continue to the next step.
Using CCLGLOS
47. You have used the Fields Glossary in
the Query Builder to help you identify the fields you need. CCLGLOS is a second
method available to find fields. From the Reports menu, select CCLGLOS.
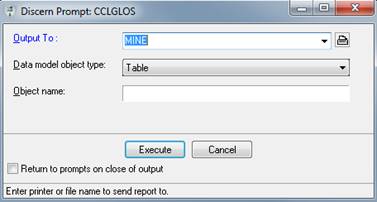
48. The Output To box has
the default value MINE. The Data Model Object Type box has the default value
Table. If not, select Table from the
selection list. In the Object Name box, enter PERSON, in uppercase.
49. Click Execute. The Report Output window opens with the data displayed in
a report format. The report shows all of
the fields in that table, its data type and a description of that field. The information displayed in this report is
the same information as when you access the Properties for a field.
50. Review the format
of the report, close the Output window and continue to the next step:
Using DVDev's
Tables/Fields tab
51.
Another way to access the Fields Glossary is to use the Tables/Fields tab located on the left
side of the workspace. Click the Tables/Fields
tab:
 .
.
If the Tables/Fields
tab is not available, from View on the main menu, select Tables Fields.
52.
Right-click the down arrow above the
Type column and select Add/Remove:
![]()

The Add/Remove Tables to Workspace dialog
box opens. You can find and select any table you want to list in the Tables/Fields tab.
53. Enter PERSON
in the Table Search box. . Select PERSON. Enter ENCOUNTER in the Table Search and select ENCOUNTER. Click OK. The
fields associated with the PERSON and the ENCOUNTER tables are listed in the
Fields list.
54. Click the down
arrow above the Type column and select ENCOUNTER.
Notice the fields associated to the ENCOUNTER table are displayed in the Fields
list. Click the arrow again and choose PERSON.
Now all fields associated with the PERSON table are displayed in the list.
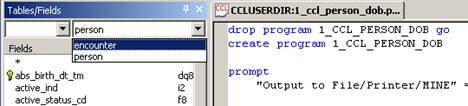
55. Give the PERSON table an alias of P by entering
P in the box that is directly below
Tables/Fields.

56. From the PERSON table, scroll down
in the list of fields to find UPDT_DT_TM.
57. Right-click UPDT_DT_TM and select Properties. Read the description of the
field and click OK when you are
finished.
58. You decide to add the UPDT_DT_TM
field to your query. From the fields list, drag UPDT_DT_TM to the last field in the SELECT list. Note you also
could type the field name directly in the source file.
59. Since all fields must be separated
by a comma, enter a comma before the P.UPDT_DT_TM.
The SELECT statement will look like
the following:
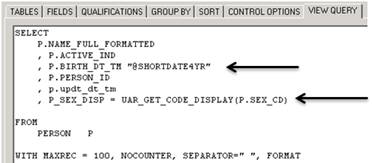
SELECT INTO $OUTDEV
P.PERSON_ID
,
P.NAME_FULL_FORMATTED
, P.ACTIVE_IND
, P.BIRTH_DT_TM
, P.UPDT_DT_TM
60. It is time to create the object by
compiling the code. From the Build menu, select Include/Compile. Choose Yes
to the message asking to Save changes to CCLUSERDIR?
61. Look at the bottom of the window for
warnings or errors. You will not get a warning this time since the object is in
the object library. When the Drop command was executed, it found the object in
the object library to drop.
62. Next, you need to execute the
program. From the Build menu, select the first Run option or click the Run Prompt Program toolbar button.
Using the Run Prompt Program toolbar
button automatically appends the group level on to the object name if needed,
similar to choosing the first Run option from the Build menu.
63. Click Execute.
64. Review the results. Notice the
UPDT_DT_TM column was added.
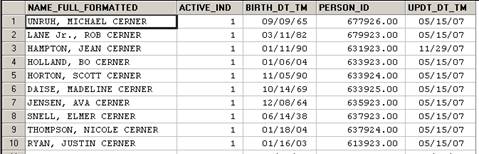
Close the Output window when you
have finished reviewing the data and continue on the next step:
Using TABLEDEF
and TABLEDEF2
65.
You can use TABLEDEF and TABLEDEF2 programs to help you
decide which fields to select. From the Build menu, select Run Prompt Program.
![]()
66. In the Program to Run dialog box, enter TABLEDEF,
and click Run. The Discern Prompt:
TABLEDEF window opens.
67. Keep MINE in the
MINE/CRT/printer/file. Since you want to review information about the PERSON
table, in the Dictionary Table Name box, enter
PERSON in uppercase.
68.
Click Execute. Your Report Output
will look like the following:
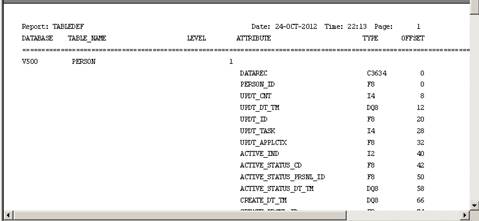
69. Review the information. Notice the
results show the table name and the type of data stored in the field. The
fields are listed in consecutive order in which they are located on the
table. Close the Output window.
70. It might be easier to find the fields
you need if they were listed in alphabetical order instead of where they appear
in the table. Use TABLEDEF2 for this purpose. From the Build menu, select Run Prompt Program.
71. In the Program to Run dialog box,
enter TABLEDEF2.
72. Leave the Parameters (leave empty to be
prompted): box blank. Click Run. The Discern
Prompt:TABLEDEF2 window opens.
73. Keep MINE in the first box of
Discern Prompt dialog box MINE/CRT/printer/file. In the Dictionary Table Name
box, enter PERSON in uppercase.
74. Click Execute. The Report Output looks like the following:
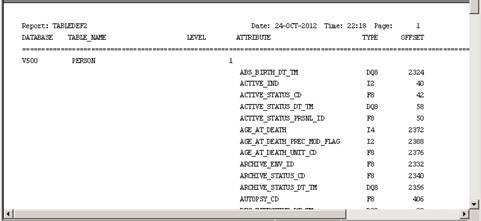
75. Review the results. The information
is the same as that in TABLEDEF. The only difference is the order the fields
are listed. Close the Output window.
76. Save
and close the file.
You have completed the activities
for the Using the Data Dictionary
topic. Return back to the Table of Contents of the WBT and click on the topic Using Data Types.
Using Data Types
Fields or columns are grouped into
three basic data types: numbers, characters, or dates. In this practice
activity, review the list of sample data and identify its data type. Use one of
the data type options listed above the sample data. Check your answers using
the key in Appendix A.
Data Types
I2
F8 C5
DQ8 VC100
Sample Data
Complete the blank with the
appropriate data type from above.
________
10
________
CBC
________
Call Dr. Jones when the CBC results are back.
________
12345.00
________
12/10/03
You have completed the activity for Using Data Types. Return to the Table of Contents of the WBT
and click on the topic, Using Field
Names.
Using Field Names
In this practice activity, complete
the blank with the field tag that best identifies the description of the field.
Examples of field tabs are ID, IND, and Key. Check your answers using the key in Appendix B.
A field that stores the unique
primary identifier of the PERSON table is most likely
PERSON______________.
A field that indicates when an order
was placed would most likely be ORIG_ORDER______________.
A field that indicates whether a row
is active would most likely be named ACTIVE___________.
A field that stores a person's last
name in uppercase characters with all spaces and punctuation removed would most
likely be named NAME_LAST_____________.
A field that stores one
of several numbers that correspond to other data would most likely be named
ORDERABLE_TYPE_____________.
You have completed the activity for Using Field names. Return to the Table of Contents of the WBT
and click on the topic, Working With
Code Values.
Working With Code Values
Create a query that shows personnel
names, their positions, and the beginning effective date. The system manager
wants the display, code value and CDF meaning for the position code to display.
In this practice activity, you will
create a query that displays the code value and text associated to a code value
by creating expressions that use different UAR routines to get the Meaning,
Display and Description for the Position_CD field.
1. You
want to create a new prompt program by creating a new source code file named 1_<your initials>_PRSNL_INFO.prg.
First, execute CCLPROT to ensure you do not overwrite an existing object with
the same object name. Refer to Creating an Executable Program for more details
on running the CCLPROT.
2. Click
the New toolbar button.
3. Select
Prompt Program as the File Type. In the Program Name box, enter 1_<your initials>_PRSNL_INFO (or
another unique name), and click OK. The entered program name is the object name
used in the Drop Program Go and Create Program …End commands. Notice the File
Name box automatically is populated with the same name and the .prg extension.
Click OK.
4. If a message box New Prompt Version Available
prompt is displayed: There is a new
Discern Prompt Builder version currently available. Would you like to set the latest version as
the default editor? Click Yes.
The Discern Prompt Builder dialog box opens. Click Save.
5. Click Yes
to the message asking Save changes to CCLUSERDIR:1_<your
initials>_PRSNL_INFO.prg*?
6. Click below the comments, "Your
Code Goes Here"
and open the Query Builder.
7. The PRSNL table contains information about
personnel. In the COMMON Category, double-click the PRSNL table from the Tables section.
8. Click the FIELDS tab and select the following fields. Arrange them in the
order listed.
· NAME_LAST
· NAME_FIRST
· POSITION_CD
· BEG_EFFECTIVE_DT_TM
9. Position your pointer over the POSITION_CD
Select Fields list. The Selected Fields shows an expression that
uses the UAR_GET_CODE_DISPLAY(). The POSITION_CD is stored in the database as a
number known as a code value. The textual value associated with the code values
are unfamiliar to most users and difficult to memorize. The Query Builder
automatically uses a User Access Routine (UAR) to convert the code value, which
is a number, into a textual value for
your output display. Run your query to see how this field appears in your result
set.
The following is an example of how
the results might look. Instead of
seeing a number for the POSITION_CD, a textual value is displayed:

When
selecting any field that ends in _CD, the Query Builder automatically builds an
expression that uses the UAR_GET_CODE_DISPLAY routine.
10. Close the Output window and follow
the next steps to add the code value and the CDF meaning.
11. In
the FIELDS tab, click Code Values under the Selected Fields
list. The Code Value Displays dialog box opens. The Display field option is
selected by default.
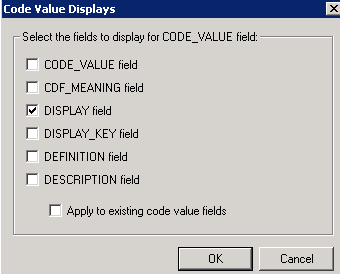
12. In
the Code Value Displays dialog box, select the following options and click OK to apply the fields to the existing
query:
- Code_Value
Field
- CDF_Meaning
Field
- Apply
to existing code value fields
13. Notice the additional fields in the Selected
Fields list. Click Run Query then
click Yes to adding a MAXREC = 100.
14. Close the Output window.
15. Close the Query Builder. The query and expressions created by the
Query Builder are written to your source code file.
16. To complete the executable program
add INTO
$OUTDEV to the right of the SELECT command.
17. From the Build menu, click Include/Compile to create the object.
Click Yes to the message asking if
you want to save changes.
18. Click ![]() to run the prompt program.
to run the prompt program.
19. Click Execute and review the results.
When you are finished, close the Output window.
20. Click the Save toolbar button ![]() to
save your file.
to
save your file.
21. From the File menu, select Close.
You have completed the activity for Working with Code Values. Return to the Table of Contents of the WBT
and click on the topic, Formatting
Fields.
Formatting Fields
Using Field Formats
Your site's system manager is
auditing the interface feeds for orders. You are asked to create a report that
lists the mnemonics of the ordered procedures, the unique order identification
number, whether comments are associated with each order, and the order date.
In this practice activity, define
the order of the fields in the report, and format a date.
1.
You want to create a new prompt program by creating a new
source code file named 1_<your initials>_ORDER_AUDIT.prg. First, execute
CCLPROT to ensure you do not overwrite an existing object with the same name.
Refer to Creating an Executable Program for more details on running CCLPROT.
2. Click
the New toolbar button ![]() .The
New dialog box opens.
.The
New dialog box opens.
3. From
the File Type list, select Prompt
Program. In the Program Name box, enter 1_<your initials>_ORDER_AUDIT or another unique name. Be sure
to keep track of your file names you will open and edit several in later
exercises. In the Logical/Path Save Location: box, enter CCLUSERDIR:. The CCLUSERDIR: directory is the default backend
directory where all files are placed unless you specify otherwise. Click OK.
4. If the following message is displayed, click Yes.
5. Accept
the default values in the Discern Prompt Builder dialog box and click Save.
6. Click
Yes to the "Save
changes to ccluserdir:file_name *?" message to save the file.
7. In
the code editor box, click below Your Code Goes Here and open the Query
Builder.
8. You think you need the ORDERS table but
decide to check the glossary first. Right-click the ORDERS table in the Common
category and click Properties.
9. Review the information in the properties and
close the window.
10. Double-click
the ORDERS table to select it.
11.
Click the FIELDS tab to select the
fields for your query.
12. Access the Glossary to review the
fields for the ORDERS table. From reviewing the descriptions,
identify the following fields:
- The
order identification
- A
field that displays the orderable name
- A
field that indicates if the order has a comment
- A
field that displays when the order was placed
Close
the Glossary.
13. Double-click the following fields
and arrange them in the listed order. Take note of each field's data type and
length as you select them from the FIELDS list.
- ORDER_MNEMONIC
- ORDER_ID
- ORDER_COMMENT_IND
- ORIG_ORDER_DT_TM
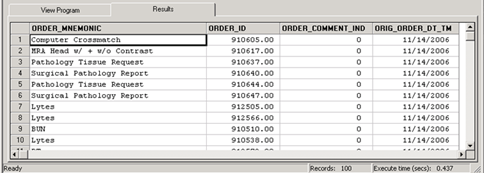
14. Click Run Query.
15. Click Yes to add the MAXREC = 100 control option.
16. In the result set, notice the format
of the O.ORIG_ORDER_DT_TM field contains a two-digit year.

This is the default format applied
to your date when the field was selected. Your site’s policy recommends dates
be displayed using a four-digit year. Close the Output window and follow the
next steps to change the format.
17. To change
the format of the order date, right-click the O.ORIG_ORDER_DT_TM field in the
Selected
Fields list and select Field Format.
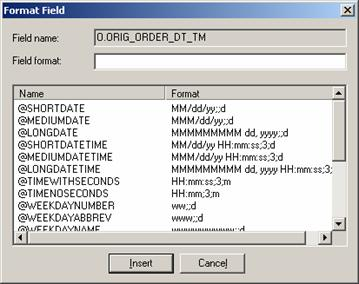
Note:
The example shows the date in MM/DD/YY format for @SHORTDATE format
option. The internationalized @SHORTDATE format option is the actual format of
the date that flexes based on locale. For example, at your location the format
might be DD/MM/YY or DD.MM.YY.
18. The
Format Field dialog box enables you to change the way data is displayed in your
result set. The Name column provides a description of the format, and the
Format column displays an example of the format. Scroll through the list and
select @SHORTDATE4YR format and
click Insert.
19. Click the View Query tab and notice the formatting option is placed to the
right of the field.
20. Execute the query and set the maximum
records to 100.
21. Verify the date now displays in the
format of MM/DD/YYYY
22.
Close
the Output window and the Query Builder.
23.
The query is written to your source
code file and will look similar to the following:
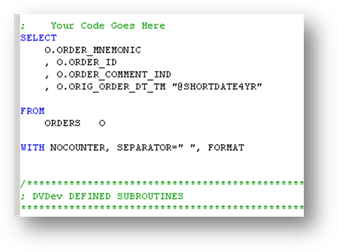
24.
Add the following commands to make
this an executable program.:
- After
SELECT, enter:
Into $OUTDEV
- At
the end of the WITH clause, enter:
,MAXREC = 100
The WITH clause should look similar
to the following:

25. Compile the commands to create the
object. Verify there are 0 errors in the Output window. You may receive a CCL–W message and 1 warning
in the messages. This message is acceptable as this is the first time this object
has been created and Drop command was not able to find the object to drop.
26. Click the Run Prompt Program toolbar button![]() . Note
:Group1 is appended to the right
of the object name if the user who logged in to DVDev is identified as a Group
1 according to Discern Explorer:
. Note
:Group1 is appended to the right
of the object name if the user who logged in to DVDev is identified as a Group
1 according to Discern Explorer:
1_CCL_ORDER_AUDIT:Group1
If the user is a DBA according to Discern Explorer, nothing is appended to
the right of the object name.
27. Accept the default parameter of MINE
and click Execute.
28. Review the query results.
29. Close the Output window. Now that
you have an object created, this program can be set up to run on demand from a
front-end application such as ExplorerMenu.exe.
30. From the File menu, select Save to save your file.
31. From the File menu, select Close.
You have completed the activity for Using Field Formats. Return to the Table of Contents of the WBT
and click on the topic, Modifying Field
Formats.
Modifying Field Formats
The system manager liked the
ORDER_AUDIT query, however; has requested you change the formatting of two
fields. He would like to remove the decimal on the Order_ID and display nine
digits, padding the ID with zeros. This accommodates increases to the Order_ID
number and displays a fixed-length number in the results. He also wants you to
include the time with the date.
In this practice activity, you will
format fields to meet the report requirements.
1.
The 1_<your
initials>_ORDER_AUDIT.prg source file should already be open. If not, open
it by clicking the Open toolbar
button ![]() .
Enter CCLUSERDIR: in the
Logical/Path box. Make sure you place the colon at the end of the logical
path. Enter 1_<your initials >_ORDER_AUDIT.PRG in
the File Name box. Be sure to deselect
the Read Only option. Click OK.
.
Enter CCLUSERDIR: in the
Logical/Path box. Make sure you place the colon at the end of the logical
path. Enter 1_<your initials >_ORDER_AUDIT.PRG in
the File Name box. Be sure to deselect
the Read Only option. Click OK.
2.
You need to eliminate the decimal in
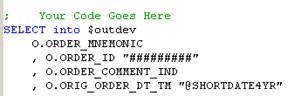
the Order_ID. After the O.Order_ID and before the comma, enter "#########" (this is nine
fill characters). The formatting results in a nine-digit order ID.
Note: if the display template had only four fill
characters "####"
and the Order_ID was actually six digits, no data would display; therefore, the
number of fill character (#) needs to be at least as long as what is stored in
the database.
3.
Compile the source code to create
the object.
4.
Click Yes to save changes to the
file.
5.
Click the Run Prompt Program toolbar button ![]() . The Discern Prompt dialog box opens. Note:Group1
is appended to the right of the object name if the user who logged in to
DVDev is identified as a Group 1 according to Discern Explorer:
. The Discern Prompt dialog box opens. Note:Group1
is appended to the right of the object name if the user who logged in to
DVDev is identified as a Group 1 according to Discern Explorer:
1_CCL_ORDER_AUDIT:Group1
If the user is a DBA according to
Discern Explorer, nothing is appended to the right of the object name.
6.
Click Execute. The Output Query window opens.
7. The
Order_ID does not have a decimal.

The system manager specifically
requested the results show nine digits padded with zeros. Close the Output
window so you can add the padding with zeros.
8. Immediately after the display template (nine
fill characters), enter a semicolon, and a P
and 0. Your syntax will look like
the following:
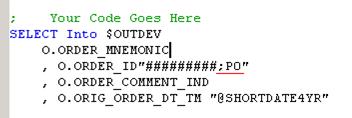
9.
Compile the source code and click Yes
to save changes to your file.
10. Click
the Run Prompt Program button ![]() to execute the program. The Discern Prompt
window opens.
to execute the program. The Discern Prompt
window opens.
11. Click
Execute. The Output window
opens.
12.
Verify the format of the Order IDs is displayed with nine
digits, padded with zeros.

Close the Output window.
13. You decide to change the format of
the Order Date to include the time. You
could type the formatting or use the Query Builder’s functionality to add the
formatting and reduce possibility of typos.
You want to add the following formatting instead of
"@SHORTDATE4YR" which is mm/dd/yyyy change it to "@LONGDATETIME" which is the textual month, the day, year
and time (for example, November 28, 2014 16:55:04).
Re-load your query in the Query
Builder by clicking on the word SELECT (or any other placed inside the query)
and press CTRL+SHIFT+Q.
14. From the Fields
tab right-click O.ORIG_ORDER_DT_TM
and select Field Format.
15. Click "@LONGDATETIME"
and then click Insert. Click Close
to close the Query Builder. The formatting change is written to your source
code file.
Note: you must include the quotes.
Your code will look similar to the following:
O.ORIG_ORDER_DT_TM
"@LONGDATETIME"
16. Include the file to pick up the
latest change by clicking the Include/Compile toolbar button or press CTRL+ F7.
17. Click Yes to save your changes. Confirm there are no errors.
18. Run
the prompt program and review the formatting change in the result set.
|
ORDER_MNEMONIC |
ORDER_ID |
ORDER_COMMENT_IND |
ORIG_ORDER_DT_TM |
|
BUN |
000589724 |
0 |
February
08, 2015 15:55:31 |
|
BUN |
000589723 |
0 |
February 08, 2015 16:11:35 |
|
Patient Isolation |
000620125 |
0 |
February
09, 2015 10:32:23 |
Close the Output window.
19.
After seeing the longer date formatting, you realize you would prefer the date
in the format of mm/dd/yyyy hh:mm, The Field Format option in the Query Builder
does not have an option for this specific formatting. In your source code file,
replace "@LONGDATETIME" with "mm/dd/yyyy hh:mm;;d".
20. Click ![]() ,
to include the file to pick up the latest change.
,
to include the file to pick up the latest change.
21. Click Yes
to save your changes and confirm there are no errors.
22. Run the prompt program and review the
formatting change in the result set.
|
ORIG_ORDER_DT_TM |
|
02/08/2015 15:55 |
|
02/08/2015 16:11 |
|
02/09/2015 10:32 |
Close the Output window.
23. The ORDER_ID column should be
completed, and the time should be displayed with the order date.
24. Save and close your file.
25. From the File menu, select Close to close the file.
You have completed the activity for Modifying Field Formats. Return to the Table of Contents of the WBT
and click on the topic, Creating
Expressions.
Creating Expressions
Building an Expression
You need to build a query that
includes person information, including their age and date of birth. Since a
person's age is not stored in the database, you need to create an expression
that calculates it at run time.
In this practice activity, you will
create an age expression.
1. You
want to create a new prompt program by creating a new source code file named
1_<your initials>_PERSON_AGE.prg. First, execute CCLPROT to ensure you do
not overwrite an existing object with the same name.
2. The
query you need to create uses many of the same data elements as the query in
the source code file, 1_<your initials>_PERSON_DOB.prg. Rather than start
a new query from scratch, you can open that file and save it with the new file
name. Start by clicking the Open
toolbar button ![]() .
.
3. In
the Logical/Path box, enter CCLUSERDIR: and in the File Name box, enter 1_<your
initials >_PERSON_DOB.PRG.
Deselect the Read Only option and
click OK.
4. You
want to take a copy and save the file with a new file name. From the File menu,
select Save As.
5. In
the File Name box, replace 1_<your initials>_PERSON_DOB.PRG with 1_<your
initials >_PERSON_AGE.PRG.
6. Click
OK.
A Confirm Save dialog box opens.
Verify the "Rename
program to match new file name"
and "Save
prompts as options"
options are selected.
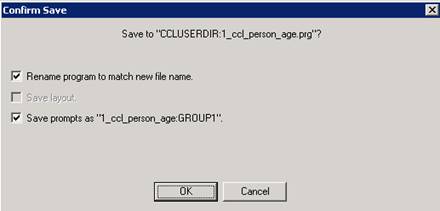
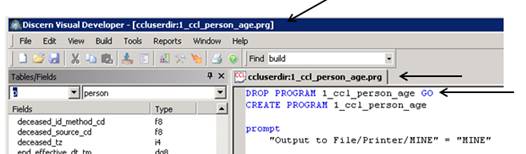
7. Click OK. Notice the name in the title bar was updated to
CCLUSERDIR:1_<your
initials>_PERSON_AGE.prg. It also updated to the object name to
1_<your_initials>_PERSON_AGE
in the DROP and CREATE commands.
8. Load
the existing query in the Query Builder. To modify the query, click the word
SELECT then press CTRL+SHIFT+Q. The
Discern Query Builder window opens.
9. First you need to add gender, which is stored
as a coded field. Click the FIELDS
tab and double-click SEX_CD to add it to the list of selected fields.
10. You would like a four-digit year to
display for the birthday and decide the MM/DD/YYYY format works best for you.
Right-click P.BIRTH_DT_TM in the
Selected Fields list and select Field
Format. Select @SHORTDATE4YR, and click Insert.
11. Click the View Query tab and review the syntax for the display option for the
date and the expression created by the Query Builder for the gender.
12. You should execute the query to validate the
data. To execute this query without
leaving the Query Builder you must remove the INTO $OUTDEV command for now. The
Query Builder in DVDev is strictly an ad hoc query tool and does not have
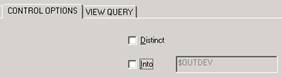
knowledge of $OUTDEV. Click the CONTROL OPTIONS tab and deselect Into.
The $OUTDEV parameter is now dithered.
If
the INTO $OUTDEV is left in the query and you attempt to execute the query from
the Query Builder, an error message would be received reminding you that input
parameters are only valid when you are executing a program that has the CREATE
command:
Failed
to execute report! Discern Explorer Program: Ad Hoc Query
%CCL-E-34-VCCL_RUN_PROGRAM(0,13)S58L2.1q1{PARAM.}Invalid
qualification expression: (PARAM.) in this command; not implemented at this
time.
%CCL-E-78-VCCL_RUN_PROGRAM(0,13)S58L1.1p4{PARAM.}Only
CREATE PROGRAM may contain parameters.
Later, when you are finished working
in the Query Builder, and ready to write the query back to the source code
file, you should check the Into
option to place the INTO $OUTDEV back in the program. The steps in this
document will remind you to reselect the Into option.
13. Run your query and verify the BIRTH_DT_TM is displaying a
four-digit year.
14. Once you have reviewed the results,
close the window to continue modifying your query.
15. You need to display a person’s age
in the output. Because age is not stored
in the system, you must create an expression that calculates the person's age
based on his or her date of birth. From the FIELDS tab, click Add
Expression to open the Add Expression dialog box.
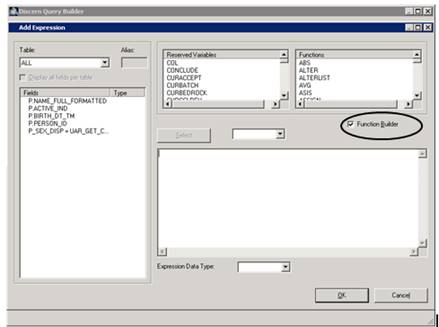
16. Notice the Function Builder option
under the Functions list is checked by default. The Function Builder helps to
build an expression with the parameters required for the function you
selected. Find and double-click the CNVTAGE function to open the Build
Function:CNVTAGE dialog box.
The CNVTAGE function can be used to
calculate a person’s age by comparing the birth date and time to the current
date and time.
17. First, you should assign the
expression a name. If you do not assign a name, the Query Builder will assign
one for you. In the Expression Alias box, enter AGE.
18. The required parameter for the
CNVTAGE function is the birth date and time.
Place your cursor in the box for the Date of birth parameter and
double-click P.BIRTH_DT_TM from the
Available Fields list to select it as the parameter.
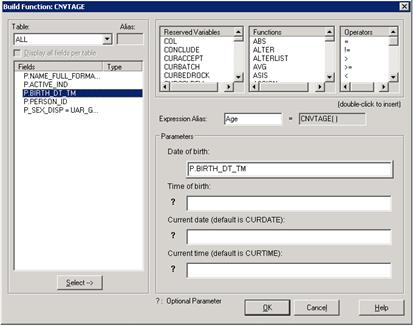
The other parameters are optional
and help to flex the way the CNVTAGE function calculates an age. For example,
you could calculate a person’s age at the point of registration.
To read about the optional
parameters, refer to the Discern Explorer Help pages:
https://wiki.ucern.com/display/public/1101discernHP/CNVTAGE+using+Discern+Explorer
19. Click
OK. The expression,
AGE=CNVTAGE(P.BIRTH_DT_TM), is written to the Add Expression dialog box in the lower-right section of the window.
The Function Builder created the expression for you. If you did not want to use
the Function Builder, you could have manually entered the expression in this
box.
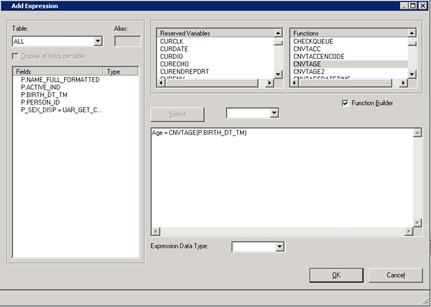
20. Click OK. The Age expression is displayed in
the Selected Fields list.
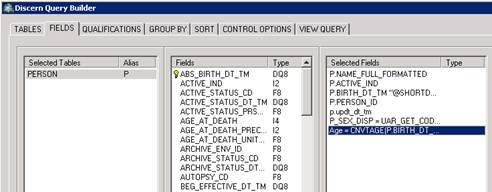
21.
Run your query and verify the output has an AGE column with ages displaying.
When you finish, close the Output window.
22. Before exiting the Query Builder,
from the Control Options tab, reselect the Into
option so INTO $OUTDEV is placed back in to your query. Click Close to close the Query Builder. Your
query is written to the source file.
23. Compile your source code to create
the object. Validate no errors occurred by checking the Output section for 0
errors. Fix any syntax errors and
re-compile the source code until 0 errors are shown in the Output section. Once
this is achieved, you have created an object that can be executed.
24. Execute the Prompt Program. Review the results.
25. Close the Output window. Save and
close the file.
Continue
with the next practice activity.
Using Concat and Trim Functions
An audit is being performed on the
personnel records. Create a query that contains a list of all staff names,
their positions, and the date and time each record was put into the system.
In this practice activity, combine
first and last names into one column by using the CONCAT and TRIM functions.
1. Instead
of beginning a new query, you decide to modify an existing query. Open the
1_<your initials>_PRSNL_INFO.PRG file you created previously.
2. Open
the file by the Open toolbar button ![]() .
.
3. Enter
CCLUSERDIR: in the Logical/Path box
and 1_<your initials >_PRSNL_INFO.PRG in the File Name box.
Deselect the Read Only option, and
click OK.
4. Execute
the program and review the results. A
person’s last and first name are displayed in different columns. The requested format is to have the first
name and then the last name together in one cell of the output. Create an expression that takes the first and
last name fields and combines, or concatenates them, into one.
5. Load
the existing query in the Query Builder, and click the FIELDS tab.
6. Click
Add Expression. The Add Expression window opens.
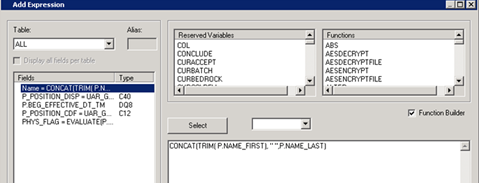
7. Discern
Explorer has a function that combines character strings into
a single value. Ensure the Function Builder option is selected, and
double-click the CONCAT function in the Functions list. The Build Function
dialog box opens.
8. Enter
Name in the Expression Alias box.
9. Next,
double-click NAME_FIRST from the
Available Fields list to add it as the first parameter.
10. Click
in the second box in the Parameters section, and double-click NAME_LAST to add it as the second
parameter.
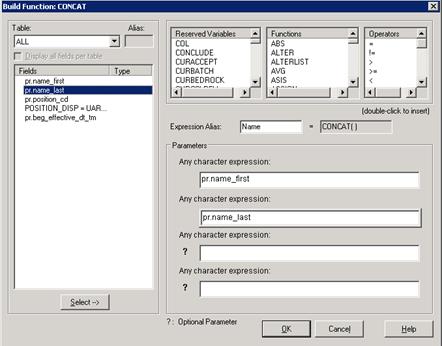
11. Click OK to finish creating the NAME expression.
12. The NAME expression syntax is
displayed in the pane in the lower right side of the dialog box. It will look
like: Name = CONCAT(pr.name_first,
pr.name_last). Click OK to add the expression to the
Selected Fields list.
13.
You no longer need the individual name fields now that you
have the name expression. Remove the two extraneous fields. In the Selected
Fields list, remove NAME_FIRST and NAME_LAST.
14. You want to make Name as the first
column in your report. Select the NAME expression and move it to the top of the
list by using the up arrow. You also can select the NAME expression and drag it
to the top of the list.
15. After making some preliminary edits,
it is always a good idea to check your work to see if the query you built is
shaping up the way you want it to. To
run this query from the Query Builder you must temporarily remove INTO
$OUTDEV. From the Control Options tab,
deselect Into. The $OUTDEV parameter
is now unavailable.
16. Run the query.
17. Why do you only seeing the first name?
The last name is hidden because there is a large amount of white space after
the first name in the expression. When Discern Explorer concatenates
fields, it accounts for the total length of each field. Since the Name_First
field is a VC200 data type, you are seeing the first name, and then the rest of
the spaces that make up the field. The last name is there, just 200 bytes over.
You want to eliminate that space for this query. Close the Output window to
make additional edits.
18. From the Selected Fields list,
select the Name Expression, and click Edit
Expression.
19. The TRIM function can be used to
remove trailing spaces from a character value.
Use the TRIM function on the NAME_FIRST column. However, you do not want
to use the Function Wizard. Deselect the Function Builder option.
20. Click between the open parenthesis
and NAME_FIRST in the expression, and double-click the TRIM function to add it
to the expression.
21. Notice the opening parenthesis of
the TRIM function is inserted before the NAME_FIRST. Add a closing parenthesis
between NAME_FIRST and the comma. It will look like the following:
NAME =
CONCAT(TRIM( PR.NAME_FIRST), PR.NAME_LAST)
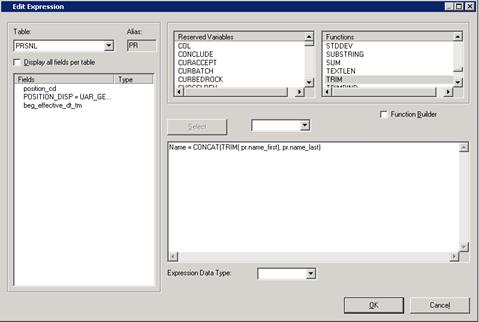
22. Click OK and run the query to see how the TRIM function is applied.
23. The report displays with first and
last names concatenated, but there is no space between the first and last
names. Close the Output window so you can edit the expression again.
24.
Select the NAME expression, and click Edit Expression.
25. You need to add a space between the
first and last names. Click just before NAME_LAST and enter a quotation mark, a
space, a quotation mark, and a comma. The expression should look like the
following:
NAME = CONCAT(TRIM( PR.NAME_FIRST),"
",PR.NAME_LAST)
26.
Click OK to save
the change.
27. Run the query. The first and last name should be displayed
in the NAME column with a space between them. Close the Output window.
28. Before exiting the Query Builder, from the Control Options tab, select the Into option so the INTO $OUTDEV is
placed back in to your query.
29. Click
Close to close the Query Builder. Compile
your source code to create the object. Validate no errors occurred by checking
the Output section for 0 errors. Fix any
syntax errors and re-compile the source code until 0 errors are shown in the
Output section.
30. Click ![]() to run the prompt program.
to run the prompt program.
31. Review the results.
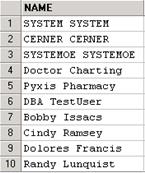
32. Close the Output window.
33.
Save and close the file.
Continue
with the next practice activity.
Using Evaluate Function
In the previous activity, you used
functions to create an expression that held the age value and the name in the
desired format. Functions, such as CNVTAGE and CONCAT, are available to assist
in creating expressions. Basically, functions are mini programs that accept
parameters and return a value.
The Human Resources department has
two messages they need to distribute through the email system-- one for
physicians, the other for non-physicians. You need to create a query that lists
the names of all staff and their email addresses, and differentiates between
physicians and non-physicians. In this practice activity, you will use the
evaluate function to define the display value for a field.
1.
You want to create a new prompt program by creating a new source code file
named 1_<your initials>_PHYS_LIST.prg. First, execute CCLPROT to ensure
you do not overwrite an existing object with the same name.
2. You
decide to open the 1_<your initials>_PRSNL_INFO.PRG file you previously
created and save it with the new file name. Click the Open toolbar button![]() .
.
3. In
the Logical/Path box, enter CCLUSERDIR: and in the File Name box, enter 1_<your initials>_PRSNL_INFO.PRG.
4. Deselect
the Read Only option, and click OK.
5. From the File menu, select Save As. In the File Name box, enter 1_<your
initials >_PHYS_LIST.PRG. Click OK. The Confirm Save dialog
box opens. Select Rename program to match new file name and Save prompts as 1_<your
initials>_PHYS_LIST.PRG option. Note both
options are selected by default.
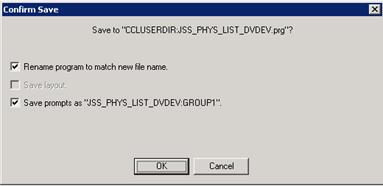
Note the
file name tab and window are updated with the new program name. The drop
program and create program commands also are updated with the new object name.
6. To
revise the query, load the existing query in the Query Builder and click the FIELDS tab.
7. Find
the field that indicates whether the person is a physician. Did you find
PYSICIAN_IND? Double-click the PHYSICIAN_IND
field to add it to the Selected Fields list.
8. Prepare
to execute the query from the Query Builder by temporarily removing INTO
$OUTDEV. From the Control Options tab, deselect Into. Click Run Query to review the results.
9.
Looking at the PHYSICIAN_IND column, you realize a value of Yes or No would be
more meaningful than a one or zero. Follow the next steps to create an
expression that returns these types of values. Close the Output window.
10. This
time you will use the EVALUATE function. The EVALUATE function returns an
expression based on a condition. Click Add
Expression to begin adding this new expression.
11. From the Functions
list, double-click the EVALUATE function. The Build Functions dialog box
opens.
12. Enter Phys_Flag in the
Expression Alias box.
13. You want to establish that a value
of one means YES and a value of zero means NO. From the Fields list,
double-click the PR.PHYSICIAN_IND
field to add it to the Expression Being
Compared to Case Values: box.
14. In
the Value to Compare to
the Case Expression: box, enter 1 as the first value for the system
to check.
15. In
the Return Value if the Above Case Value
= Case Expr: box, enter the character string "Yes". Be
sure to enter the quotation marks. When a value of one is encountered in the
PR.Physician_IND field, the system will return the character string Yes.
16. In
the Value to Compare to the CASE
Expression: box, enter 0.
17. In the Return Value if the above CASE Value = CASE expr: box, enter "No". Be
sure to include the quotation marks.
When a value of zero is encountered in the PR.Physician_IND
field, the system returns the character string No.
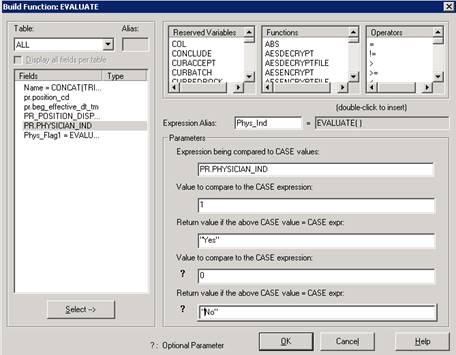
18. Click
OK to add the expression.
19. Review the expression that the Function
Builder built for you. Remember you also can manually enter the syntax for the
expression. Click OK to continue.
20. Run the query to see the changes
that were made to the results.
21. Review the data in the expression
column to confirm each value of one correlates to the character string of Yes
and each zero correlates to No.
22. Close
the Output window.
23. Before compiling the code, add INTO $OUTDEV to the select
clause. Close the Query Builder.
24.
Compile your source code to create the object. Validate
there are no errors.
25. Run the prompt program.
26. Validate
the results are what is expected. Close the Output window.
27. The
query is ready for Human Resources. Save and close the file.
You have completed the activities
for Creating Expressions. Return to the Table of Contents of the WBT
and click on the topic, Working with
Qualifications.
Working with Qualifications
Creating a Qualification
As you saw in the Understanding
Qualifications demonstration, qualifications help limit the data returned in
your queries. The WHERE clause is used to specify which rows should be
returned. There are five types of qualifications available. A single
qualification is used to make one condition and each record must qualify on
that condition.
Note:
In the following practice activities, you will add
qualifications to limit the amount of data returned. If you are using an
environment that does not contain much data, your queries might not return any
data. In those cases, expand or change
the qualification until you return data. For example, if the query limits data
to a particular month, you might need to try another month or several months
until you return data.
In this practice activity, you will
create a query that has a single qualification.
You will create a report that provides a list of encounters along with
the date and time of registration and discharge. You want to qualify the query
to include only active encounters.
1. You
want to create a new prompt program by creating a new source code file named
1_<your initials>_DISCH_RPT.prg. First, execute CCLPROT to ensure you
will not overwrite an existing object with the same name.
2. Create
your new Prompt Program file with the name 1_<your initials>_DISCH_RPT,
or another unique name.
3. To
start your query, place your cursor under Your Code Goes Here, and open the
Query Builder.
4. Since
this query is to analyze encounter information, double-click the ENCOUNTER table, and click the FIELDS tab.
5. Add
the following fields and arrange them in the order listed:
·
Encntr_ID
·
Reg_DT_TM
·
Disch_DT_TM
·
Active_IND
6. Change
the format of the date and time fields. Right-click REG_DT_TM and select Field
Format.
7. Select
@MEDIUMDATETIME, and click Insert.
8. Change
the format of the DISCH_DT_TM to @MEDIUMDATETIME.
9. Run
the query to review the results. Click Yes
to set the maximum record count to 100. Note a value of 1 in the Active_IND column
indicates the encounter is active. Close the Output window.
10. You want to extract the encounters
that have a value of 1 in the Active_IND field so your output lists only active
encounters. Click the QUALIFICATIONS
tab to place restrictions on the query.
11. The QUALIFICATIONS tab is where you build the syntax needed to limit
the list to active encounters only.
Begin creating your syntax by clicking WHERE.
12. Double-click ACTIVE_IND in the Fields list.
13. Select the equal (=) sign from the
operators list located to the right of the WHERE
button.
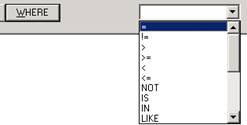
14. Enter 1 at the end of the
statement. Because you are qualifying on a numeric field, the value is entered
without quotation marks. Your qualification will look like the following:
Note you could also manually type
the syntax in this box.
15.
Run your query. Make
sure you only return a maximum of 100 rows.
16. Your results should have only rows
with a value of 1 in the Active_IND column. Close the Output window.
17. Close the Query Builder. The query is written
to your source file.
18. To the right of SELECT, enter INTO $OUTDEV.
19.
At the end of the WITH statement, enter:
MAXREC
= 100
20. Compile your source code to create
the object. Validate there are no errors.
21. Run the prompt program and review
the results.
22. Close the Output window. Save and
close the file.
You have completed the activities
for Creating a Qualification. Return to the Table of Contents of the WBT
and click on the topic, Working with
Indexes.
Using Indexes
You want to create a query that
shows all personnel names beginning with the letter A.
In this practice activity you will
create qualifications using indexed field to improve the performance of the
query.
1. You
want to create a new prompt program by creating a new source code file named
1_<your initials>_PRSNL_NAME.prg. First, execute CCLPROT to ensure you do
not overwrite an existing object with the same name.
2. You
can use a program you have already created as the starting point for the new
program. Open the source code file named 1_<your initials>_PRSNL_INFO.prg
file and using Save As, save the
file with the new file name of 1_<your initials>_PRSNL_NAME.prg. Remember
to deselect the read only option and
verify the object name in the Drop and Create commands have changed to
1_<your initials>_PRSNL_NAME.
3. Load
the existing query in the Query Builder and go to the Fields tab to begin modifying the query.
4. Add
the NAME_LAST_KEY to the Selected
Fields list and move the field to the top of list.
5. From
the Control Options tab, increase
the maximum records to display to 100 records.
6. Run the
query to view the results, but to run it from the Query Builder, you must first
deselect the INTO option from the CONTROL
OPTIONS tab. Since there are not any qualifications yet, this query
displays all personnel up to the number of rows applied by the MAXREC control
option. Close the Output window.
7. You want to
limit the query to persons who have a last name starting with A. Adding
qualifications that use an index field is an effective way to improve the
efficiency of the query and limits the data being returned for more meaningful
results. Before the qualification is added, research to see if there is an
index field that can be used in the qualification. Go to the FIELDS tab. In the Fields list there are yellow and red keys to the
left of some of the fields. The yellow key indicates the field is used in one
or more non-unique indexes. The red key indicates the field is used as the
unique index for that table.
8. Click the yellow key next to NAME_LAST_KEY. A
drop-down list displays the fields that make up that index.

The NAME_LAST_KEY is listed first in this
composite index. If we add a
qualification using this field, the chances of accessing this index is
increased. Close the list.
9. If a field is used in multiple indexes, the
drop-down list allows you to look through the different indexes where that
field is used. Click on the key next to
NAME_FIRST_KEY_A_NLS. A drop-down list
displays the fields that make up that index.
Click the right-arrow to see how the field is used in the next index.
Close the list.
10. Let’s review another way to view indexes.
Click the Show Indexes button. The
Fields list changes to display each index and the fields that make up the
index.
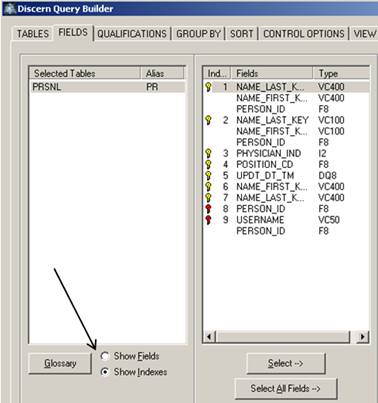
11. Click
the QUALIFICATIONS tab. View the
list of indexed fields by selecting the Indexes
option located under the Table list. This view of the indexes displays each
index and the fields that make up the index, similar to the Show Index view.
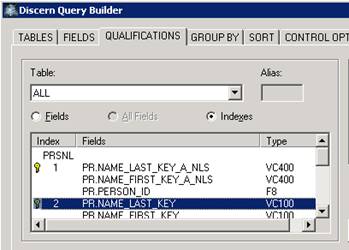
12. Another way to view indexes is CCLORATABLE.
Close the Query Builder to access this tool.
13. Click the Run Prompt Program toolbar button. Enter CCLORATABLE in the
Program To Run box.
14. Click Run.
15. In the Table Name box, enter PRSNL
and click Execute. A report displays
showing the indexes for the table. Each
index is given a name such as XPKPRSNL.
In some reports you may run or see the reference to this index name.
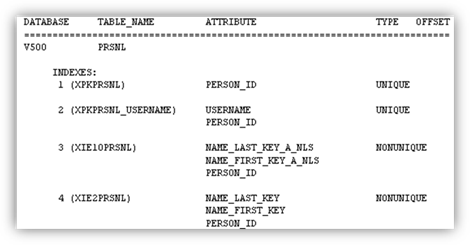
16. Notice there is an index that lists
NAME_LAST_KEY as the first field for the index whose name is XIE2PRSNL. Since
the query will qualify on the person’s last name, the NAME_LAST_KEY can be used
to do an index read on the PRSNL table. Close the Output.
17. The next method to view indexes is
from the Tables/Fields tab.
18. In the Tables/Fields tab, notice the yellow and red keys give you a visual
indication that the field makes up the index or is a part of an index.
Right-click anywhere in the Fields list and select Indexes from the menu.
19. The Fields list has changed to display
each index and all of the fields that make up the index. This view is similar
to the Show Indexes view and also the report displayed from CCLORATABLE. You
have reviewed many options to find indexed fields and are ready to add the
qualification.
20. Under the From statement, enter WHERE
PR.NAME_LAST_KEY = "A*". Remember to add quotes around the
character string.
21.
Increase the maximum records to display to 100 records.
22.
To the right of the SELECT add INTO
$OUTDEV.
23. Compile your source code to create
the object. Validate no errors occurred.
24. Execute the program.
25. Your results should display only
those persons who have last names beginning with the letter A. Close the Output
window.
26. It is required that when you compare
a field in the table that has a character data_type , the value it is compared
to must be wrapped in quotes. If you
forget, when the program executes, it will error. Try removing the quotes and
compiling the program to see what happens. The program compiles
successfully. But then execute the
program. You should receive errors similar to the following:
%CCL-E-104-1_CCL_PRSNL_NAME(0,0)S56L3.2p3{}Plan;
Invalid user defined plan.
%CCL-E-35-1_CCL_PRSNL_NAME(0,0)S56L3.2q1{}Comparison of expression: (ATTR.)
incompatible in type to expression: (<NAME>).
%CCL-E-67-1_CCL_PRSNL_NAME(0,0)S56L3.2q1{}Invalid
select variable (A) encountered.
The first error indicates a problem
with the qualification section. The second error indicates you are comparing a
character field to a different data_type.
The data types in the qualification must match. Wrapping the quotes around the value ensures
a character data type. The third error
indicates it doesn’t know what A is.
27.
Add the quotes back.
28.
Compile your source code to create the object. Validate no errors occurred.
29. Run the program
30. Close the Output window. Save and
close the file.
You have completed the activity for Using Indexes. Return to the Table of Contents of the WBT
and click on the topic, Using Date/Time
Qualifications.
Using Date/Time Qualifications
In the last demonstration, you
reviewed information about the CNVTDATETIME function and how it can be
used to translate dates and times in different formats into one value that can
be understood by the database.
In this practice activity, you will
select a pre-defined date and time format that uses the CNVTDATETIME function
when qualifying on a date.
1. The
Admitting Director at your site needs encounter information for all patients
discharged in March of the previous year. . You decide you can modify an
existing file. Open the file named 1_<your initials>_DISCH_RPT.PRG.
Remember to deselect the Read Only
option.
2. Load
the existing query in the Query Builder and go to the FIELDS tab.
3. The
admitting director wants the report to show the reason for the visit. In the
Fields list, locate the field for REASON_FOR_VISIT
and add that field to the Selected Fields list.
4. Your
query needs to find encounters discharged in a specific date range, which
requires a qualification. Before you add the qualification, look at the indexes
for the table and determine if there is an index field that can be used for
qualifying on discharged patients. What index field did you find?
![]()
5. Click
the QUALIFICATIONS tab and add to
your qualification by typing AND or
select AND from the operators list
located to the right of the WHERE
button.
6. Double-click E.DISCH_DT_TM to add it
to the qualification.
7.
Select the Greater
Than or Equal To (>=) symbol from the operator list.
![]()
8. The Query Builder provides several
sample conversion options to facilitate writing your qualification.
Select 31-DEC-2014 23:59:59.00 from the
Date/Time Conversion Options list.
9. Notice the Query Builder
automatically inserts the CNVTDATETIME function for you. Adjust the date and
time to March 1st of the previous year, using the same format of DD-MMM-YYYY
and the time to be at the beginning of the day.
For example:
AND
E. DISCH_DT_TM >= CNVTDATETIME("01-MAR-2014 00:00:00.00")
10.
It is helpful to break your syntax into several rows to make it easier to read.
Press Enter to start a new line.
11. Add the AND operator to begin building the second half of your
qualification.
12. Double-click DISCH_DT_TM to add it to the qualification.
13. Next select the Less Than or Equal To (<=) operator.
14. Select the "31-DEC-2014 23:59:59.00"
example from the Date/Time Conversion Options list again.
15. Adjust the date to be March 31st
of the previous year using the same format of DD-MMM-YYYY. The time value will
stay the same which already reflects the end of the day. For example:
AND E.DISCH_DT_TM <= CNVTDATETIME("31-MAR-2014
23:59:59:00")
Your qualification should now look
similar to the following:
WHERE
E.ACTIVE_IND = 1
AND E.DISCH_DT_TM >=
CNVTDATETIME("01-MAR-2014 00:00:00.00")
AND E.DISCH_DT_TM <=
CNVTDATETIME("31-MAR-2014 23:59:59:00")
16. Your query should return only
discharges that occurred between March 1st, starting at the beginning of the
day, and March 31st, ending at the end of the day. From the Control Options tab, deselect the Into option and run the query.
17. Review the results. The query should
show only discharges that occurred in March of the previous year. If your query
does not return any data, your environment might not contain data for that time
frame. You might need to adjust the month or year.
18. Close the Output window. Reselect
the Into option and close the Query
Builder. Validate INTO $OUTDEV is to the right of SELECT and add it if it is
not there.
19. Compile your source code to create
the object. Validate no errors occurred.
20. Run your program.
21. Only those encounters that occurred
in March of the previous year should be in the query output. Close the Output
window.
22. Save the file. You will use this
file in the next practice activity, so you do not need to close it.
Continue
with the next practice activity.
Using Between in Qualifications
In the previous activity, you
specified a date range using the operators >= and <=. The Between
operator is another way to specify a range that requires less syntax than the
>= and <= operators, and is a commonly used technique.
In this practice activity, you will
use the Between operator to create a qualification for a date range.
1. The
Admitting Director wants a report that shows only January and February
admissions for the previous year. You will use the source code file named
1_<your initials>_DISCH_RPT.PRG file as a starting point. You want to
create a new prompt program by creating a new source code file named 1_<your
initials>_ADM_RPT.prg. First, execute CCLPROT to ensure you do not overwrite
an existing object with the same name.
2. If
it is not already, open the 1_<your initials>_DISCH_RPT.PRG. Be sure to deselect the Read Only option.
3. Save
the file with the new file name, 1_<your
initials>_ADM_RPT.prg. Verify the object name in the Create and Drop
program changed to 1_<your initials>_ADM_RPT.
4. Load
the existing query in the Query Builder.
5. Go
to the QUALIFICATIONS tab.
6. You
need to insert a new qualification using the BETWEEN operator and use another
date and time option. Instead of deleting the already-existing qualification,
comment the lines for future reference by placing a semicolon as the first
character on each of the lines in the existing qualification. Whenever a
semicolon is detected, the system ignores everything to the right of it and
treats it as a comment. The following
shows an example of commented lines:
;WHERE
E.ACTIVE_IND = 1
;AND E.DISCH_DT_TM
>= CNVTDATETIME("01-MAR-2014 00:00:00:00")
;AND E.DISCH_DT_TM
<= CNVTDATETIME("31-MAR-2014 23:59:59:00")
6.
Below the commented-out code, add
the following qualification:
WHERE E.Reg_DT_TM
8. Since
you want data for a two-month time span, select the BETWEEN operator.
9. This
time, select the CNVTDATE(123114),0
example from the Date/Time Conversion Options list. The zero represents the
time value for the beginning of that day. Notice again the Query Builder
automatically inserts the CNVTDATETIME function for you.
10.
Change the date from 123114 to January 1st of the current year in MMDDYY.
If the year is 2015, then the date should be 010114.
11. On the next row, select the AND operator.
12. Select the CNVTDATE(123114),235959 example from the Date/Time Conversion
Options list. The number 235959 is representing the last moment in time for
that day.
13. Change this date from 123114 to
February 28th of the previous year in MMDDYY such as 022814.
The qualification should now look similar to the following:
WHERE E.REG_DT_TM BETWEEN
CNVTDATETIME(CNVTDATE(010114),0)
AND
CNVTDATETIME(CNVTDATE(022814),235959)
14. Go to the CONTROL OPTIONS tab and deselect the Into option and run the query to verify the results. Only
admissions for January through February of the previous year should be
displayed. If you do not return any rows, you might need to change the
qualification to different months or a different year.
15. Close the Output window. Reselect the Into option and then close the Query Builder.
16. Save your changes, compile your code
and check for errors.
17. Run the prompt program and verify only
admissions for January through February of the previous year are displayed.
18. Close the Output window.
19. Save and close the file.
You have completed the activities
for Using Date/Time Qualifications and Using Between in Qualifications. Return to the Table of Contents of the WBT and
click on the topic, Multiple
Qualifications.
Creating Multiple Qualifications
As you saw in the previous
demonstration, you must be careful about writing syntax with multiple
qualifications. Evaluate what data you want returned, and add parentheses to
group the qualifications appropriately.
In this practice activity, you will
create a query with multiple qualifications. The results should display order
information for orders placed in January of the previous year for two specific
orders.
1. You want to create a new prompt program by
creating a new source code file named 1_<your initials>_JAN_ORDERS.prg.
First, execute CCLPROT to ensure you do not overwrite an existing object with
the same name.
2. Once you have selected a unique name, create a new
Prompt Program file with the new file name.
3. Place
your cursor under Your Code Goes Here and open the Query Builder to begin
creating the query.
4. The
data you want to include in the report are orders. From the TABLES tab, select the ORDERS table, and then go to the FIELDS tab.
5. Select
the following fields and arrange them in the order listed.
- ORDER_MNEMONIC
- ORDER_STATUS_CD
- ORIG_ORDER_DT_TM
6. Run
the query and limit the maximum record count to 100.
7. Select
two common procedures listed in the ORDER_MNEMONIC column and write down their
mnemonics. Be sure to note any capitalization. This course will use the CMP (Comprehensive
Metabolic Panel) and BUN (Blood Urea Nitrogen) procedures as examples. Close the Output window.
8. Click
the QUALIFICATIONS tab. Add the
start of a qualification to limit the output to only the two procedures by
typing:
WHERE O.ORDER_MNEMONIC =
9. After the equals (=) sign, enter the
order mnemonic of the first order, such as "CMP". You are qualifying on a character field, so enclose the
text in quotes.
10. Add the OR operator, and the field O.ORDER_MNEMONIC. Make the
O.ORDER_MNEMONIC equal to the second order mnemonic in quotes. Your
qualification will look similar to the following:
WHERE
O.ORDER_MNEMONIC = "CMP" OR O.ORDER_MNEMONIC = "BUN"
11. Run the query and validate the query
returns the two orders you defined in the qualification. Close the Output
window.
12. Add the AND operator as a start for adding a date and time
qualification.
13. You want to qualify the query to
include only the procedures ordered within a specific month in the previous
year. Double-click O.ORIG_ORDER_DT_TM.
14. Since you want to qualify on a range
of dates, select the BETWEEN
operator.
15. Select "31-DEC-2014 23:59:59:00" from the Date/Time Conversion
Options list.
16.
Change the date and time to January 1st of the previous year, such as
"01-Jan-2014 00:00:00.00"
17. Begin another new line to make this
qualification easier to read. Press ENTER.
18. Select the AND operator, and select "31-DEC-2014
23:59:59:00" from the Date/Time Conversion Options list.
19. Change the date and time to January
31st of the previous year such as, "31-JAN-2014 23:59:59.00". Your qualification will look
similar to the following:
WHERE
O.ORDER_MNEMONIC = "CMP" OR O.ORDER_MNEMONIC = "BUN"
AND
O.ORIG_ORDER_DT_TM BETWEEN CNVTDATETIME("01-JAN-2014 00:00:00.00")
AND
CNVTDATETIME("31-JAN-2014 23:59:59:.00")
20. Run the query to check the output.
Again, you might need to adjust the date in your qualification if your no data
is returned.
21. Look
carefully at the data. The output is not what is expected. The first procedure
in the qualification displays and the dates are outside of the expected range
or the second procedure displays within the date range. To prevent this, you
must group your qualification into logical groups using parentheses to guide
the processing. Close the Output window to modify your syntax.
22. Because you want to find the two
orders, and apply the date range qualification, you must insert parentheses
around the order mnemonic qualification. Add open parentheses before the first
O.ORDER_MNEMONIC and close parentheses after the name of the second order.
23. Parentheses should also be placed
before and after the date/time qualification. This allows the date and time
range qualification to be applied to the subset of ordered procedures. Add open
parentheses before O.ORIG_ORDER_DT_TM and close parentheses at the end of the
syntax. Your qualification will look similar to the following:
WHERE (O.ORDER_MNEMONIC = "CMP" OR
O.ORDER_MNEMONIC = "BUN")
AND (O.ORIG_ORDER_DT_TM BETWEEN
CNVTDATETIME("01-JAN-2014 00:00:00.00")
AND
CNVTDATETIME("31-JAN-2014 23:59:59:.00"))
24.
Run the query and verify your results.
25. You should see both procedures, such
as the CMP and BUN. The Order date should be limited to January of previous
year. Review the data, close the Output window.
26. Close the Query Builder.
27. Add the output device. After SELECT,
enter:
INTO $OUTDEV
28. At the end of the WITH statement,
enter:
,MAXREC
= 100
29. Compile your source code and check
for errors.
30. Run the Prompt program.
31. Close the Output window. Save and
close the file.
You have completed the activity for Creating Multiple Qualifications. Return to the Table of Contents of the WBT and
click on the topic, Understanding Joins.
Joining Tables
Creating a Join
In this practice activity, you will
build a query that uses two tables to return order and person information in
the result set. The output should return a list of persons who had a particular
procedure ordered in a specific month of the previous year.
1. Begin
by opening the 1_<your initials>_ORDER_AUDIT.PRG file you previously
created. Be sure to deselect the Read
Only option.
2. Run
the query so that you can view the order mnemonics in your system.
3. Write
down the order mnemonic for one of the procedures. The procedure name CMP will
be used as an example in this activity. Close the Output window.
4. You
want to create a new prompt program by creating a new source code file named
1_<your initials>_SINGLE_ORD_RPT.prg. First, execute CCLPROT to ensure
you do not overwrite an existing object with the same name.
5. Use
Save As to save the file with the
new file name, 1_<your
initials>_SINGLE_ORD_RPT.PRG. Verify the object name in the Drop and
Create commands changed to 1_<your initials>_SINGLE_ORD_RPT.
6. Load
the existing query in the Query Builder.
7. The
Orders table is already selected. You also want a list of patient names in the
report, so from the TABLES tab, add
the PERSON table.
8. Notice
the alias has been assigned to each table in the Selected Tables list. Go to
the FIELDS tab.
9. Both
tables are displayed in the Selected Tables list and the first table, ORDERS,
is selected. The Fields list displays only the fields for the selected table,
in this case ORDERS. You need to add the ORDER_STATUS_CD
field. Scroll down and double-click this field.
10. From the PERSON table, add the NAME_FULL_FORMATTED and the PERSON_ID field. Move these fields to
the top of the Selected Fields list.
11. Now that there are two tables
referenced in the query, link the tables using a common field. Study the
indexes for the ORDERS and PERSON table and identify the common fields between
the two tables. What common fields did
you find?
_______________________________________________________________________________
12. Did
you find: UPDT_DT_TM and PERSON_ID? The UPDT_DT_TM field should not be used to
link the tables because the date and time represent when that specific row was
updated, however, doesn’t represent any correlation between the PERSON and ORDERS
tables. That leaves PERSON_ID. The
PERSON_ID is the primary or unique key on the PERSON table. The PERSON_ID resides on the ORDERS table and
helps identify who that order belongs to.
This field is an index on the ORDERS table. Since a person can have
multiple orders, they can have multiple rows on the ORDERS table. A person’s row can be identified by the
PERSON_ID, which is considered a foreign key.
13.
Go to the QUALIFICATIONS tab to
begin linking the ORDERS table to the PERSON table. .
NOTE:
Running a query where the tables have not been linked is extremely resource
intensive and should never be executed.
If you query tables without linking them, the system does not know which
order to pair with which patient, so every record in the Orders table is returned
and erroneously matched with every row from the Person table causing a
Cartesian product and a waste of system resources. Using the common field to
link the tables establishes the correct match between the tables.
The PLAN/JOIN syntax establishes a
link between the tables being read. You create the syntax for linking tables in
the qualification section. The PLAN is used to identify the table that you
intend to be read first. The table you intend to read first should be the table
that returns the fewest amounts of rows using the most restrictive index.
14. Start to build the syntax by clicking the PLAN button.
15. Identify the alias for the PERSON table and
enter the alias to the right of the word PLAN. For this example, the alias is
P. Click the JOIN button to begin
the next piece of the syntax.
16. Identify the alias for the ORDERS
table and enter O after the Join
statement.
17. Click WHERE to begin adding the linking statement.
18. Select P.PERSON_ID,
enter the equal sign and then select O.PERSON_ID.
Note you also could reverse this portion of the qualification and add
O.PERSON_ID = P.PERSON_ID instead. Your qualification will look similar to the
following:
PLAN P
JOIN O WHERE P.PERSON_ID = O.PERSON_ID
19. You need to restrict the query to show only the
orders for the procedure you previously wrote down. Select the AND operator from the list and the add O.ORDER_MNEMONIC.
20. Select the equals (=) operator, and enter the name of the procedure, such as "CMP",
in quotes to limit the query to the specified order. The value in quotes is
case sensitive and must be typed exactly how it is in the database. Your syntax should look similar to the
following. (You might have another procedure instead of CMP.)
PLAN P
JOIN O WHERE P.PERSON_ID = O.PERSON_ID
AND O.ORDER_MNEMONIC= "CMP"
21. You need to run the query, but first
deselect the Into option from the CONTROL OPTIONS tab. Run the query and
validate the results displays rows for only the specific order that you
selected in your qualification. The results display persons that have a
matching row on the orders table. For each PERSON_ID that has a match on the
ORDERS table, the results bring back a row for each order, duplicating the
person information.
22. The tables are joined correctly with
only the specified order in the list. The results display persons that have a
matching row on the orders table. For each PERSON_ID that has a match on the
Orders table, the results will bring back a row for each order, duplicating the
Person Information.
23. Write down the month and year of when one of
the orders was placed and close the Output window.
24. You
need to limit the data to include the specific order placed within a certain
month and year. On a new row, add the AND
operator and the O.ORIG_ORDER_DT_TM
field.
25. Add the BETWEEN operator and select the CNVTDATE(123114), 0 date and time conversion option.
26. Add the AND operator, and select the CNVTDATE(123114),
235959 date and time conversion option.
27. Modify the dates so the query only
returns results for a specific month and year that you previously identified.
The following is an example showing a date range qualification:
PLAN P
JOIN O WHERE P.PERSON_ID = O.PERSON_ID
AND O.ORDER_MNEMONIC= "CMP"
AND O.ORIG_ORDER_DT_TM BETWEEN
CNVTDATETIME(CNVTDATE(010114), 0)
AND CNVTDATETIME(CNVTDATE(013114), 235959)
28. Run the query.
29. Review
the results. Your query should show a list of patients with the selected
procedure, such as CMP, ordered within the month specified in the
qualification.
|
PERSON_ID |
NAME_FULL_FORMATTED |
ORDER_MNEMONIC |
ORDER_ID |
ORDER_COMMENT_IND |
ORIG_ORDER_DT_TM |
|
677925.00 |
Taylor, Marcus |
CMP |
12211383.00 |
0 |
01/23/2014 |
|
677926.00 |
Lane, Michael |
CMP |
12211387.00 |
0 |
01/23/2014 |
|
677928.00 |
Levine, Edward |
CMP |
12211391.00 |
0 |
01/25/2014 |
|
677930.00 |
Holland,Bo |
CMP |
12211392.00 |
0 |
01/26/2014 |
Note if you were to create the same
query using a single WHERE clause, the qualification would be:
WHERE P.PERSON_ID = O.PERSON_ID
AND O.ORDER_MNEMONIC
= "CMP"
AND
O.ORIG_ORDER_DT_TM BETWEEN
CNVTDATETIME(CNVTDATE(010114),0 )
AND
CNVTDATETIME(CNVTDATE(013114), 235959 )
30. Close the Output window. Reselect
the Into option from the CONTROL OPTIONS tab and then close the
Query Builder.
31. Compile your source code and check
for errors.
32. Run the program.
33. Close the Output window. Save and
close the file.
You have completed the activity for Creating a Join. Return to the Table of Contents of the WBT and
click on the topic, Complex Joins.
Joining Three Tables
The hospital
administrator needs a census of all patients currently registered in your
system.
1.
You want to create a new prompt by opening a new source code
file named 1_<your initials>_ CENSUS_RPT.prg. First, execute CCLPROT to ensure you do not
overwrite an existing object with the same name.
2. Click
under Your Code Goes Here, and open the Query Builder.
3. The
data you need for this query is located on three tables, but you should add
only the first two to test your Join before adding a third table. Select the ENCOUNTER and ENCNTR_DOMAIN tables first. The ENCNTR_DOMAIN table captures
current census information. Since this table is not listed in the COMMON folder,
enter ENCNTR_DOMAIN in the Table Filter box and then select the MILLENNIUM category. Select the table
and then clear out the text in the Table Filter.
4. Click
the FIELDS tab.
5. Select
the following fields from the ENCOUNTER table and arrange them in the order
listed:
- LOC_NURSE_UNIT_CD
- LOC_ROOM_CD
- LOC_BED_CD
- ENCNTR_TYPE_CLASS_CD
- REG_DT_TM
- ENCNTR_ID
6. Select the
ENCNTR_DOMAIN_TYPE field from the ENCNTR_DOMAIN table.
7. Review the indexes on
both tables to find the common field to use for linking. What common field did you find?
_________________________________________________________________________________
8. Click the QUALIFICATIONS tab to begin creating
the Join.
9. You should start the qualification using the table
that has the least number of rows on the table or the table that you have the
best index read. The ENCNTR_DOMAIN table typically has fewer rows than the
ENCOUNTER table as this table stores current encounter information. Click the PLAN button and enter the alias for ENCNTR_DOMAIN table.
10. Next you
need to join to the ENCOUNTER table. Click JOIN
and enter the alias.
11. Next, click WHERE to add the linking
statement.
12.
The ENCNTR_ID field is common to both tables. To the right of WHERE, add ENCNTR_ID = ENCNTR_ID. Make sure to put the proper alias in front of
the field names. The linking statement
should be similar to the following:
WHERE
E. ENCNTR_ID = ED.ENCNTR_ID
13. Run the query to make sure no syntax
errors have been introduced and your results displays encounters that have
matching rows on the tables. The output might be more readable if all of the
rows for a specific nursing unit were grouped together. Follow the next steps
to sort the data by nursing unit. Close the Output window.
14. Select the PERSON table, and go to the FIELDS
tab.
15. Select the NAME_FULL_FORMATTED and PERSON_ID
fields from the PERSON table.
16.
Review the indexes to find the common field between
the PERSON and ENCOUNTER table to use for linking. What common field did you
find?
_________________________________________________________________________________
17. Go to the QUALIFICATIONS tab so you can join the PERSON table.
18. Insert JOIN on the next line.
19. Enter the alias, P, for the
PERSON table and then the alias for the PERSON table.
20. Click WHERE to start the linking statement.
21. The PERSON_ID is the common link.
Add PERSON_ID = PERSON_ID. Make sure to put the proper alias in front of
the field names. Your qualification should
look similar to the following:
PLAN ED
JOIN E WHERE E.ENCNTR_ID = ED.ENCNTR_ID
JOIN P WHERE P.PERSON_ID = E.PERSON_ID
22. This qualification joins all three
tables. Run the query and validate for each encounter in the result set, their
name and ID is also displayed. Click the
View Program tab and review the
syntax of the entire query.
23. When you are finished, close the
Output window and the Query Builder.
Remember, the same qualification to
join tables can be written using single WHERE syntax:
WHERE E.ENCNTR_ID = ED.ENCNTR_ID
AND
P.PERSON_ID = E.PERSON_ID
24. Next to the SELECT, add: INTO
$OUTDEV
25. At the end of the WITH statement,
enter:
,MAXREC
= 100
26. Compile your source code and check
for errors.
27. Run the Prompt program.
28. Review the results. Close the Output
window. Save and close the file.
You have completed the activity for Joining Three Tables. Return to the Table of Contents of the WBT and
click on the topic, More Join Logic.
Creating a Non-Linear Join
In this
practice activity you will join three tables. You will create a non-linear join
path by joining the PERSON and ORDERS table, and then joining the PERSON table
to the ADDRESS table.
1.
You want to create a new prompt by opening a new source code
file named 1_<your initials>_ ADDRESS_RPT.prg. First, execute CCLPROT, to
ensure you do not overwrite an existing object with the same name.
2. Once you have a unique name, create a new
Prompt Program by selecting New and
then choose a file type of Prompt
Program.
3. Click
under Your Code Goes Here and open
the Query Builder.
4. It
is a good idea to first join two tables and verify the output before you add a
third table. From the TABLES tab,
select the PERSON and ORDERS tables.
5. From
the FIELDS tab, select the following
fields:
- PERSON_ID
- NAME_FULL_FORMATTED
- ORDER_ID
- ORDER_MNEMONIC
6.
Review the indexes to
find the common field between the PERSON and ORDERS table to use for linking.
What common field did you find?
________________________________________________________________________________
7. Select the QUALIFICATIONS
tab to add the qualification for linking the tables.
8. Use PLAN and JOIN syntax to join the ORDERS
table to the PERSON table whenever the PERSON_ID of the ORDERS table is the
same as the PERSON_ID of the PERSON table.
Your qualification should look similar to the following:
PLAN P
JOIN O WHERE O.PERSON_ID = P.PERSON_ID
9.
Add a qualification on the PERSON table
to eliminate any rows if the PERSON_ID is 0.0. Your PLAN statement should look
like the following:
PLAN P WHERE P.PERSON_ID != 0.0
10.
Run the query to make sure there are no errors and the
results displays people and their orders.
11. Close
the Output window, return to the TABLES
tab and add the ADDRESS table. To
find the ADDRESS table, use the Table Filter, type ADDRESS and click the MILLENNIUM
folder.
12. Add the following fields from the ADDRESS table:
- Street_Addr
- State
- Zipcode
- Parent_Entity_ID
- Parent_Entity_Name
13. As the addresses belong to a person
and not an order, join the ADDRESS table to the PERSON table to get the
addresses. Review the indexes to find the common
field between the PERSON and ORDERS table to
use for linking. What common field did
you find?
_____________________________________________________________________________
14. Select
the QUALIFICATIONS tab and join the
ADDRESS table to the PERSON table. Check your qualification against the
following example. Your qualification should look similar to the following:
PLAN P
JOIN O WHERE O.PERSON_ID = P.PERSON_ID
JOIN A WHERE P.PERSON_ID = A.PARENT_ENTITY_ID
15. Run the query and review the
results.
16. The results potentially could show
more than one address per person. That address could potentially belong to a
business that has the same PARENT_ENTITY_ID as the PERSON_ID. To ensure you are only return addresses for a
person and not a business, you need to distinguish what table should be used to
reference back to the ADDRESS table. Add the following to the qualification:
AND A.PARENT_ENTITY_NAME = "PERSON"
17. Your qualification should look like the
following:
PLAN P
JOIN O WHERE O.PERSON_ID = P.PERSON_ID
JOIN A WHERE P.PERSON_ID
= A.PARENT_ENTITY_ID
AND A.PARENT_ENTITY_NAME =
"PERSON"
18. Run the query and review the
results. Your query should return people, their orders and addresses.
19. When you are finished, close the
Output window and the Query Builder.
20. Add the INTO $OUTDEV to the SELECT and set the maximum number of records
returned to 100.
21. Compile your source code and check
for errors.
22. Run the prompt program.
23. Review and close the Output window.
Save and close the file.
You have completed the activity for Creating a non-Linear Join. Return to the Table of Contents of the WBT and
click on the topic, Qualifying on Coded
Fields.
Qualifying on Coded Fields
Making a Qualification Portable - Qualify on Males
The prolog is a section in the
program where you place commands that you want executed before the main SELECT
command. A common command used in the prolog section is to set global variables
that will be used throughout the program. The EPILOG section is a section of
the program where you place the commands you want executed after the main
SELECT statement is executed.
In this practice activity, you will
look up code set and code value information to be used in commands placed in
the prolog section that will make your code portable to any environment.
1. As
part of a census, you will create a program that lists the names and ages of
all males currently in your system. You want to create a new prompt program by
opening a new source code file named 1_<your initials>_ PERSON_MALES.prg. Execute CCLPROT to ensure you do not
overwrite an existing object with the same name.
2. Once
you have a unique name in mind, open the previously created file 1_<your
initials>_PERSON_AGE.prg, and save it with the new file name using Save As
from the File menu. Be sure to deselect the Read Only box.
3. Open
the Query Builder and click the TABLES
tab and select the PERSON table.
4. From
the FIELDS tab locate the SEX_CD
field and note the data type.
5. Because
code_values are assigned during the build process, the actual code_value number
can vary between domains and environments. If you are building a qualification
and reference a specific code_value, that qualification might only work as you
expect for that domain. When that program moves to a new domain, you would need
to check what the code_value is for that domain and change the qualification to
reference the proper value. Instead, it is recommended to find out the
code_value for that domain before the query is executed. In this activity, we want
to query only for males. Because gender is stored as a coded field, you need to
find the code value for this specific domain before the main query runs. First
you need to know the code set used to store the gender values. Right-click SEX_CD, select Properties and note the code set number.
6. The
code set for SEX_CD is 57. Remember the code set is defined by Cerner and does
not vary between domains or facilities. You need to find the CDF Meaning
for males. In the Field Properties dialog box, click Lookup.
7. The CDF Meanings are Cerner-defined and give
code values universal and consistent meaning across domains and facilities.
Record the textual value from the CDF_MEANING column.

8. Close
the Output window and the Field Properties window.
9. Follow
the next steps to create and populate a global variable to capture the code
value for male in the specified domain that executes before the main query
command. Click under the DVDev Declared
Variables section in the code editor.
10. You need to define the global
variable. Think of the global variable as a holding field. Enter DECLARE MALE_VAR = F8. This statement
establishes MALE_VAR as the global variable with an F8 data type. You chose the
F8 data type because that is the same data type as the P.SEX_CD field.
11. The global variable, MALE_VAR, is
going to be used to store the code value for Male. The recommended way to do
this is by using a UAR (User Access Routine). On the next line enter:
SET
MALE_VAR = UAR_GET_CODE_BY ("MEANING",57,"MALE")
The variable section of your source
file should look similar to the following:
/**************************************************************
; DVDev DECLARED VARIABLES
**************************************************************/
DECLARE MALE_VAR = F8
SET MALE_VAR = UAR_GET_CODE_BY
("MEANING",57,"MALE")
12. Now that you have established a
global variable to capture the specified code value, you can use MALE_VAR to qualify
on the SEX_CD field in your query. Enter the following qualification:
WHERE P.SEX_CD = MALE_VAR
13. Compile your
source code and check for errors.
14. Run the prompt program. The
query should have returned only males. Close the Output window.
15. The Add Code Value Builder can also be used
to populate the variable. The
builder automatically adds the UAR_GET_CODE_BY() routine for you. Enter a semi-colon in front of the DECLARE
and SET commands to comment them out.
16. From
the Tools menu, select Add Code Values.
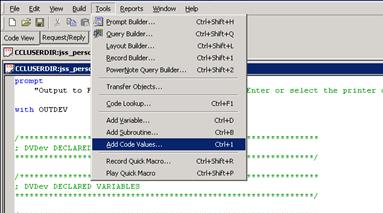
The Add Code Values dialog box
opens.
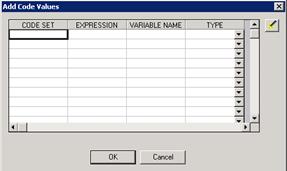
17.
Click the Code Set Wizard ![]() button.
The Code Set Wizard dialog box opens.
button.
The Code Set Wizard dialog box opens.
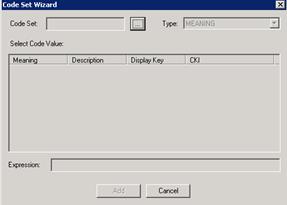
18. Click the ellipsis button ![]() .
The Available Code Sets window displays.
.
The Available Code Sets window displays.
19. In the Code Set box, enter 57, and click OK. The Code Set Wizard
opens and displays all of the code_values for that code_set.
20.
In the
Select Code Value box, select MALE,
and click Add.
21.
The
Add Code Values dialog box opens again with the grid populated.

Click OK.
You should now see the commands to
create and populate the global variable written to the Prolog Commands section
that looks similar to the following:
DECLARE
MALE_VAR = F8 WITH
CONSTANT(UAR_GET_CODE_BY("MEANING",57,"MALE")),PROTECT
The builder populates the global variable
using a different technique, but accomplishes the same thing of populating the
global variable. The CONSTANT declare
option forces the variable to not allow the value of the variable to change
throughout the life of the program. The PROTECT scoping option ensures that a
variable in a parent process with the same variable name cannot override the
value in the current process.
22. Compile the source file and check for any
errors.
23. Execute the program and validate the query
only returns males. Close the Output window.
24.
Save the file but keep the file open and continue with the next practice
activity.
Troubleshooting
the UAR_GET_CODE_BY()
Sometimes when you are troubleshooting issues with a
program, it is helpful to be able to isolate a piece of code. For example,
maybe you want to test that the UAR_GET_CODE_BY() successfully populated the
variable with the proper Code_Value.
In this practice activity, you will
execute a set of commands to make sure the variable has the correct Code_Value.
1. From the
source code you currently have open, highlight the entire DECLARE command that
creates MALE_VAR and copy it using Ctrl + c.
2. Open a New-> Blank file from the File
menu.
3. Paste the DECLARE command to the blank file
using Ctrl+v.
4. Add the command GO to the end of the command.
5.
Add the following command to the file on the next line:
CALL
ECHO(MALE_VAR) GO
The Call Echo() command echoes an
expression to the displayer and is useful to use when troubleshooting issues.
In this example, using the Call Echo() will display the Code_Value for MALE
that was returned by the UAR_GET_CODE_BY().
Your file should now contain the following
commands:
DECLARE
MALE_VAR = F8 WITH CONSTANT(UAR_GET_CODE_BY("MEANING",57,"MALE")),PROTECT
go
CALL ECHO(MALE_VAR) GO
A.
Execute the commands by selecting Include/Compile from the Build menu.
7.
Click No to save changes.
8.
To see the output of the Call Echo()
select Listing from the View menu.
The following is an example of the Listing:
1)DECLARE MALE_VAR = F8 WITH
CONSTANT(UAR_GET_CODE_BY("MEANING",57,"MALE")),PROTECT go
1)CALL ECHO(MALE_VAR) GO
363.000000
9.
Review the Listing file and look for the Code_Value listed immediately
after the last command. In this environment, the Listing is showing that the
Code_Value for MALE is 363.0. 10. Close the Listing file.
11.
What would happen if you changed "MALE" to "male" in the
UAR? Try it out!
12.
When you are done, save the file using the file naming convention 1_<your
initials>_UAR_Check.prg.
Continue
with the next practice activity.
Making a Qualification Portable – Qualify on an Order
In the previous exercise, you
created and populated a global variable that stored the Code_Value for males.
You then used that global variable in the qualification to limit the result set
to only display males. Next you will get more experience making your programs
portable by creating a report that qualifies on a specific order.
In this practice activity, you will
look up code set and code value information to be used to populate a variable
which then can be used in a qualification. Using this technique ensures your
program is portable to any environment.
1. You will
create a query that shows only a specific order. This activity will use the
procedure name Blood Urea Nitrogen (BUN) as an example. First, execute CCLPROT
to verify the object name, 1_<your initials>_ORDER_RPT, is unique.
2. You
decide to modify an existing query rather than start one from the beginning.
Open the 1_<your initials>_ORDER_AUDIT.prg file and use Save As to save
it with the new file named 1_<your initials>_ORDER_RPT.prg. Verify the
object name in both the Drop and Create commands have been changed to
1_<your initials>_ORDER_RPT.
3. Click
anywhere inside the SELECT and open the Query Builder. From the FIELDS tab, locate CATALOG_CD and note
the data type.
4. You
want to limit the result set to only show a specific order. For this example,
we want to only see the Blood Urea Nitrogen orders. The order procedure names
are stored in the ORDER_MNEMONIC field and also on the CATALOG_CD field. To
limit the results to that specific order, a qualification is needed. But first, look at the Fields list and
compare the ORDER_MNEMONIC to the CATALOG_CD to decide which one is best to use
in the qualification. What difference did
you notice?
Using indexes for qualification is
one of the most important things you can do to ensure the query runs as
efficiently as possible. The CATALOG_CD is an indexed field and would be more
efficient to use in a qualification. To complete the qualification, you need to
know the code_value that represents Blood Urea Nitrogen.
5. Right-click CATALOG_CD and select Properties. Write down the code_set:
Code_Set:________________________________________________________________________
6.
Click Lookup.
7.
Find Blood Urea Nitrogen and note
the capitalization of the description. Also write down the Code_value for the
orderable.
Description:_________________________________________________________________
Code_value:_________________________________________________________________
Close the Output window and the
Properties window.
8. From
the QUALIFICATIONS tab, add a
qualification to only display orders for Blood Urea Nitrogen. Your
qualification should look similar to the following; however, your code_value
will most likely be a different number then the one shown here:
WHERE
O.CATALOG_CD = 2921234.00
9. Close
the Query Builder. Compile your source code and check for errors.
10. Run the
prompt program and validate only data for the specific orderable is displayed.
Close the Output window. If your database does not have any orders for BUN,
select a different order name and change the code value so that you have rows
returned in your output.
Since
the code_value can change in different domains, it is recommended to populate a
global variable with the code_value used for this specific domain before the
SELECT command is executed. Then the qualification can reference the global
variable instead of the hard-coded number.
11. Click under the DVDev Declared
Variables section.
12. Define and populate a global variable called
BUN_VAR by either using DECLARE and SET or by using the Add Code Value builder
The commands to populate the global
variable should look similar to one of the following:
DECLARE
BUN_VAR = F8
SET BUN_VAR = UAR_GET_CODE_BY
("DISPLAYKEY",200,"BLOODUREANITROGEN")
DECLARE BUN_VAR = F8
WITH
CONSTANT(UAR_GET_CODE_BY("DISPLAYKEY",200,"BLOODUREANITROGEN")),PROTECT
13. You need to modify the qualification
to use your global variable, for example,
WHERE O.CATALOG_CD = BUN_VAR
14. Compile
your source code and check for errors.
15. Run
the prompt program.
16. Only
the procedure you added to the qualification should have been returned. Review
the results.
17. Close
the Output window. Save and close the file.
Continue
with the next activity.
Qualify on Coded Fields, Joining Two Tables
Your site is sending a schedule of
events to all persons listed in the system. This schedule is to be sent to
their homes, so you need to build a query that lists the names and home
addresses of all people in the system.
1. You
want to create a new prompt program by creating a new source code file named
1_<your initials>_PERSON_MAIL.prg. First, execute CCLPROT to ensure you
do not overwrite an existing object with the same name.
2. Start
a new prompt program with the new file name.
3. Click
under Your Code Goes Here, and open the Query Builder.
4. Since
you need person and address information, select the PERSON and ADDRESS tables.
5. Add
the NAME_FULL_FORMATTED field from
the PERSON table.
6. Select
the following fields from the ADDRESS table, and arrange them in the order
listed:
- Street_Addr
- City
- State
- Zipcode
- Address_Type_CD
- Parent_Entity_ID
- Parent_Entity_Name
7. Now
add the Join. Read the PERSON table first, and join the ADDRESS table. Be sure
you join them using the ID fields from the list of indexes. Create the Join,
and run the query to check the results. If you need help, refer to the
following example.
Your qualification will look like
the following:
PLAN P
JOIN
A WHERE A.PARENT_ENTITY_ID = P.PERSON_ID
8. Run
your query to check the results. Look at the results, specifically in the
PARENT_ENTITY_NAME column. Notice some organization
addresses are included in your list. Remember, this is because the ADDRESS
table stores both person and organization addresses. The value in the
PARENT_ENTITY_NAME field indicates the type of address and also the table of
the related data. You need to write the qualification so it includes only
person addresses because you want the schedule of events to be sent to people,
not businesses. Review the values in the PARENT_ENTITY_NAME field and write
down the value needed for the qualification. Close the Output window, and
modify the qualification so that the output includes only Person addresses. If
you need help, refer to the following example.
Your qualification will look like
the following:
PLAN P
JOIN A WHERE A.PARENT_ENTITY_ID = P.PERSON_ID
AND A.PARENT_ENTITY_NAME =
"PERSON"
9.
Run the query again to check the
results and validate only addresses returned are for a person. Look at the
results in
the ADDRESS_TYPE_CD column.
10. The ADDRESS_TYPE_CD field is showing
both business and home addresses for a person. You need to modify the
qualification one more time so only home addresses are displayed. Close the
Output window and the Query Builder.
11. Add the output device and the
maximum records command.
12. Compile your source code and check
for errors.
13. If there are no errors, run the
program.
14. Since ADDRESS_TYPE_CD is a coded
field, the process of limiting the addresses is similar to the process you used
in a previous query where you limited the query to only males. First, find the
code set number; note one of the textual values for the code set and what
column the text is coming from. Then, create and populate a variable and add a
qualification. Give it a try, and if you need help, refer to the following
steps:
a) From the FIELDS tab, right-click ADDRESS_TYPE_CD
and select Properties.
b) Document the code set number.
c) Click Lookup.
d) Document the textual value for Home and the
column it is listed under.
e) Close the Output window.
f) Click under the DVDev DECLARED VARIABLES
comment and enter
DECLARE
HOME_IND = F8
SET
HOME_IND =
UAR_GET_CODE_BY("MEANING",212,"HOME")
g) Add the following to the qualification:
AND
A.ADDRESS_TYPE_CD = HOME_IND
15. Compile your source code and check
for errors.
16. Run the program and validate only
home addresses are returned in the results.
17.
Close the Output window. Save the file.
Continue with the next practice
activity.
Qualify on Coded Fields, Joining Three Tables
For your final query in this
section, you need a report that lists medical services and the patients name
and encounter information for services used in the previous year. The data will come from three tables: PERSON,
ENCOUNTER and ENCNTR_ALIAS.
1. You
want to create a new prompt program by creating a new source code file named
1_<your initials>_MED_SERVICE.prg. First, execute CCLPROT to ensure you
will not overwrite an existing object with the same name as 1_<your
initials>_MED_SERVICE.
2. Start
a new prompt program.
3. Click
under Your Code Goes here, and open the Query Builder.
4. Select
the PERSON and ENCOUNTER tables.
5. From
the FIELDS tab, select the following
fields and arrange them in the order listed.
- E.MED_Service_CD
- P.Name_Full_Formatted
- E.ENCNTR_ID
- E.Reg_DT_TM
- E.Disch_DT_TM
- E.Reason_For_Visit
6. From
the QUALIFICATIONS tab, use the PLAN
to read the ENCOUNTER table first and add a qualification to only select rows
where the person was registered last year.
7. Use the JOIN and to link the PERSON table to
the ENCOUNTER table.
Your qualification should be similar to
the following:
PLAN E WHERE E.REG_DT_TM BETWEEN
CNVTDATETIME("01-JAN-2014 00:00:00.00")
AND CNVTDATETIME("31-DEC-2014 23:59:59.00")
JOIN
P WHERE P.PERSON_ID = E.PERSON_ID
8.
Run your query and validate you are
getting encounter information and the person’s name.
9.
Close the Output window
10.
Next, add the ENCNTR_ALIAS table and the following fields:
·
EA_ALIAS
·
EA.ENCNTR_ALIAS_TYPE_CD
11. Use the JOIN
to join the ENCNTR_ALIAS table to the ENCOUNTER table.
Your
qualification should be similar to the following:
PLAN E WHERE
E.REG_DT_TM BETWEEN CNVTDATETIME("01-JAN-2014 00:00:00.00")
AND
CNVTDATETIME("31-DEC-2014 23:59:59.00")
JOIN P WHERE P.PERSON_ID = E.PERSON_ID
JOIN EA WHERE
EA.ENCNTR_ID = E.ENCNTR_ID
12. Run the query and validate you are
displaying aliases for an encounter. Look at the ENCNTR_ALIAS_TYPE_DISP column
in your results. Notice you have a couple of different types of aliases listed.
For this query, you want to only display medical record numbers (MRNs). Close
the Output window.
13. Close the Query Builder. Add the input parameter for the output device
and limit the number of rows returned to 100.
14. Create and populate a global
variable called MRN_VAR that has the code_value that represents MRN. Refer to
the following list if you need assistance populating the variable:
a) From
the FIELDS tab, right-click the ENCNTR_ALIAS_TYPE_CD from the
ENCNTR_ALIAS table and select Properties.
b) Write
down the code set number listed.
d) Click
Lookup and document the textual
value for MRN for one of the code set display options.
e) Close
the Output window and the Field Properties window.
f) Click
under the DVDev Declared Variables section and enter the following:
DECLARE MRN_VAR
= F8
SET MRN_VAR =
UAR_GET_CODE_BY("MEANING", 319, "MRN")
15. Add a qualification that references
the global variable MRN_VAR to return only MRN’s.
16. Compile your source code and check for
errors.
17. Run the program and validate the
results displays only the alias of MRN’s for an encounter.
18. Close the Output window.
19.
Your program should be similar to the following:
DROP PROGRAM
1_ccl_med_service GO
CREATE PROGRAM
1_ccl_med_service
PROMPT "Output to
File/Printer/MINE" = MINE
WITH OUTDEV
DECLARE MRN_VAR = F8
SET MRN_VAR =
UAR_GET_CODE_BY("MEANING",319 , "MRN")
SELECT INTO $OUTDEV
E_MED_SERVICE_DISP =
UAR_GET_CODE_DISPLAY(E.MED_SERVICE_CD)
, P.NAME_FULL_FORMATTED
, E.ENCNTR_ID
, E.REG_DT_TM
, E.DISCH_DT_TM
, E.REASON_FOR_VISIT
, EA.ALIAS
, EA_ENCNTR_ALIAS_TYPE_DISP =
UAR_GET_CODE_DISPLAY(EA.ENCNTR_ALIAS_TYPE_CD)
FROM PERSON
P
, ENCOUNTER E
, ENCNTR_ALIAS
EA
PLAN E WHERE E.REG_DT_TM
BETWEEN CNVTDATETIME("01-JAN-2014 00:00:00.00")
AND
CNVTDATETIME("31-DEC-2014 23:59:59.00")
JOIN P WHERE P.PERSON_ID = E.PERSON_ID
JOIN EA WHERE EA.ENCNTR_ID = E.ENCNTR_ID
AND EA.ENCNTR_ALIAS_TYPE_CD = MRN_VAR
WITH MAXREC = 100,
FORMAT, SEPARATOR = " "
END
GO
20. Save the file. Keep this file open
to use in the next exercise.
You have completed the activities
for Working with Coded Fields. Return to the Table of Contents of the WBT and
click on the topic, Sorting.
Sorting
Sorting and sub-sorting enables you
to define the order and organize the output. Sorting combines information into logical
groups, which is important to improve the readability of the output of queries
and reports.
You will add an ORDER BY to two
programs you previously created to increase the readability and usefulness of
the result set.
Creating Sorts Project 1
You recently completed a query that
displays encounters and the medical service.
You can improve the display of the results by displaying all encounters
for a specific medical service together.
Within the specific medical group, you can display the person’s names in
ascending order.
1. If
it is not already open, open the file 1_<your_initials>_MED_SERVICE.PRG.
2. Load
the existing query in the Query Builder, and click the SORT tab.
3.
The SORT tab
allows you to add the ORDER BY clause to your query so that you can sort the
data in ascending or descending order. The Fields list displays all fields and
expressions selected for display; however, you can select any field from the
table for sorting. Double-click the expression
created for MED_SERVICE_CD.
The field you selected is now listed
in the box on the right side of the window. The first field in the list is the
primary sort. You can sub-sort up to ten levels. Notice
the Asc option is selected by default.
4. Close the Query Builder and review the syntax for the ORDER
BY. This command is optional, but when
used, it must be placed after the FROM clause and any qualifications.
ORDER
BY E_MED_SERVICE_DISP
5. Compile, check for errors and run the program. Validate that medical services are grouped
together in ascending order, so a medical service that starts with "A" should be listed first. The following is an example showing the
sort order of the medical service:
Close the Output window.
6. Enter DESC
to the right of the expression in the ORDER BY clause like the following:
ORDER
BY E_MED_SERVICE_DISP DESC
Working
in the Query Builder and choosing DESC, places the option to the right of the
field as you have done manually.
7. Compile and run the program to see how the data is rearranged. Now
the medical service is listed in the reverse order.
8. Within each grouping of Medical Service, display people in
alphabetical order. Reload the Query
Builder. From the SORT tab, select NAME_FULL_FORMATTED. Close the Query
Builder and review the syntax used to sub-sort.
9. Compile
and run the program to see how the data is rearranged. For each medical service, the names of the
people within that grouping should be listed in alphabetical order.
9.
Close the Output window. Save and
close the file. This file will be used again in the section titled Building A
Report.
Continue
to the next practice activity
Creating Sorts Project 2
You
previously created a query that provided census information for current patients. You need to modify the query to sort the
patients by location.
11. Open the 1_<your
initials>_CENSUS_RPT.PRG file.
12. Reload the query in the Query
Builder and go to the SORT tab.
13. Double-click E_LOC_NURSE_UNIT_DISP
to create a primary sort by nursing unit in ascending order.
14. From the CONTROL OPTIONS tab, deselect Into
option and run the query. The output should display nursing units in
alphabetical order. If you have nursing
units that start with a number, those will be listed before the units that
start with a letter. Below is an example of the nursing units sorted in
ascending order:
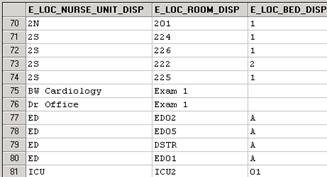
Close the Output window and return to the
SORT tab.
15. Next, within each nursing unit, you
want to sub sort by room and then by bed.
Double-click E_LOC_ROOM_DISP,
and E_LOC_BED_DISP.
16. Run the query and review the
results. Within a nursing unit, the rooms should be displayed in ascending
order. If there is more than one bed in
a room, the beds will be displayed in ascending order. The following is example data showing the
primary and sub sorts:
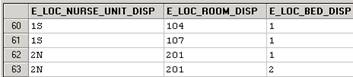
17. Close the Output window. From the CONTROL OPTIONS tab, reselect the Into option and close the Query
Builder.
18. Review the ORDER BY syntax that was
added to the source file. The ORDER BY follows the qualification and subsequent sort items are separated with a comma. For
example:
ORDER BY
E_LOC_NURSE_UNIT_DISP
, E_LOC_ROOM_DISP
, E_LOC_BED_DISP
19. Compile your source code and check
for errors.
20. Run the program.
21. Close the Output window. Save the
file, but keep it open for use in the next exercise.
You have completed the activities
for Sorting. Return to the Table of Contents of the WBT and
click on the topic, Setting Controls.
Working with Control Options
In the last practice activity, you
used ORDER BY to sort by nursing unit as your primary sort and two ascending
sub-sorts by room and bed. As you have seen, sorting
enables you to organize the data in your output. You also can place limits or
controls on your report, such as setting various print options, placing
delimiters between selected columns, and modifying other aspects of your
report.
Setting Control Options
Control Options enable you to place
controls on your query, such as the number of records read and maximum
processing time. Both of these options are useful when you are in the testing
mode of your query.
In this practice activity, set a
maximum number of records to be returned in the query and specify an amount of
time allotted to run the query.
1. Open
the 1_<your initials>_CENSUS_RPT.prg file used in your last exercise.
2. Scroll down to the bottom of the file to
find the WITH clause. When you created
this program, you manually added MAXREC = 100. This number indicates how many
records are to be processed. It is helpful to limit the number of returns when
testing a new query. When you complete the development of a query, the MAXREC
is typically taken out of the WITH clause so all records are processed. Change this value from 100 to 10.
3. Compile your source
code and run the program.
4. The
number of rows in your output should now be 10. Close
the Output window.
5. You
can also control the MAXREC control option using the Query Builder. Re-load the
query in the Query Builder and click the CONTROL
OPTIONS tab. Change the Max Records from 100 to 1000.
6. Another helpful development control option is
TIME. The control option TIME allows you to pass a number in the unit of
seconds to control the total allotted time to execute a program. From the
Additional Control Options list, click TIME
=. Then enter 30.
7.
Close the Query Builder.
8.
Compile your source code and execute
the program. If your program takes more
time than what you have allotted to execute, you will receive a message
indicating time has run out:

When you click OK, results may display, however, the results could be an
incomplete data set.
9. Close
the Output viewer and save your file.
10. Return
to the course to continue.
Creating a Prompt
Discern Prompt Builder is an
interactive component available to use in DVDev containing a set of controls used
to build and maintain prompt controls that interact with the end-user at run
time.
In this practice activity, you will
build a prompt based on last name.
1. Find
and open the 1_<your initials>_PRSNL_NAME.prg file. Be sure to deselect the Read Only option.
2. From
the Tools menu, select Prompt Builder.
3. If
the object name is not defaulted already, enter 1_<your initials>_PRSNL_NAME in the Program Name box and
click OK.
4. Click
Add to add a new prompt.
5. Available
tabs are displayed. Start by adding the text that will display to the end user
in the prompt. Type Enter a person’s last name: in the Prompt
Display box.
6. Double-click
in the Prompt Name box and enter LNAME. This is the name we will use to
reference the prompt in the program. The General
tab will look like the following example:
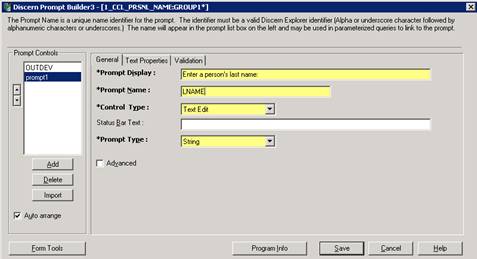
7. When you are finished, click the Text Properties tab.
8. If
the user does not enter anything in the prompt, you want the query to look for
last names with any value, so we want the default value to be the wildcard.
Enter the asterisk (*) in the Default Value box. You
also want the characters to be uppercase. Select the Upper option in the Character Case section. The Text Properties tab will look like the
following example.
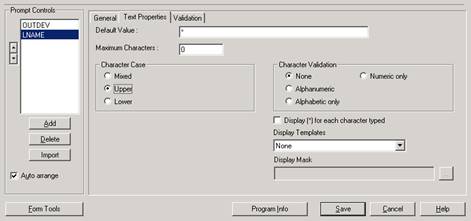
9. Click
Save to save the prompt you just
created.
10. The last time you used this file,
you searched for all names that began with the letter A. In this case, you want
names returned that the user enters at the prompt. In the WHERE statement, change "A*"
to $LNAME without quotation marks.
11. Compile your source code and check
for errors.
12. Run the program. The prompt should
open with the wildcard defaulted in the Enter
a person’s last name box. Keep the wildcard and run the query.
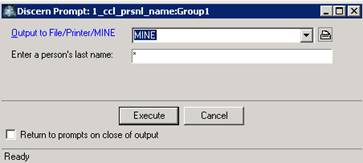
13. The output should return all names,
not just those beginning with the letter A. Close the Output window.
14. Run the program again, but this time
limit the output to only those people who have a last name beginning with the letter
S. Run the program, enter S* in the Enter
a person’s last name prompt, and click Execute.
15. Only names starting with the letter
S should be returned in the results. Write down the last name of a person that
was returned in your result set.
16. Close the Output window.
17. Run the prompt program again, but
this time, enter the last name you wrote down in the previous step in the
prompt. Notice the system defaults all letters to uppercase.
18. The results should now show only
those people with the last name you entered in the prompt. Close the Output
window.
19. Save and close the file.
Note:
The functionality for creating prompts within Discern
Explorer is very robust. This practice activity covered only one basic
concept. You can review the Use Prompt
Builder tutorial to gain a better understanding of prompt functionality.
You can click this link or find the tutorial on: https://wiki.ucern.com/display/reference/Discern+Explorer+Reference+Pages
Once
you locate the Discern Explorer
Reference Pages, access Use Discern Prompt Builder from the Use category.
You have completed the activity for Creating Prompts. Return to the Table of Contents of the WBT and
click on the topic, Building Reports.
Building a Report
It
is good practice to be sure the query runs correctly and the information you
retrieve is the information expected before building the report. Following this
process, any problems you encounter while using Reportwriter should be narrowed
to the Reportwriter logic itself and not the query. The following steps will
guide you through the five primary sections of the
Reportwriter.
Defining the Head Report
The Head Report section processes only one time and is a good
place to display items that should only appear once at the beginning of a report,
such as a report title, report date and time, or program name.
In
this practice activity, add the necessary commands to create a report header by
placing the name of the report in the Head Report section.
1. Open the file that has the query that retrieves encounters associated to a specific medical service named,
1_<your initials>_MED_SERVICE.prg.
2. First you
want to add a title to your report. After the ORDER BY but before the WITH
clause, type:
HEAD
REPORT
3. On the next line,
enter the following commands to display the title of the report and then
increment the row by 2:
ROW 1 COL 56 "MEDICAL SERVICE
REPORT"
ROW + 2
The number following the COL command is a
rough estimate on where you think the item should go on the report, with the
range approximately ranging from 0 to 120.
Typically, you have to go through a trial and error to get the item
exactly where you want it by adjusting the number and re-running the program.
4. Compile your
source code and check for errors. Run the program to see the items added for
the Head Report.
5. Review
the results. Since you have only added display commands to display the title,
the title will be the only item displayed on the report. Close the Output
window.
6. Save
the file, but keep it open for the next practice activity.
Continue
with the next practice activity.
Head Page
The Head Page is a section that
processes one time for each page that is created. Place items you want to
display at the top of every page in the Head Page section. In this practice
activity, add the necessary commands to display the report date and column
headers to the report.
1. If
it is not already open, open the file 1_<your initials>_MED_SERVICE.prg.
2. You
want the run date of the report to display at the top of the report. After the
Head Report commands to print the title, type HEAD PAGE.
3. On
the next line, enter the following commands to display the text label title of
the report and then increment the row by 2:
COL 5
"Report Date:"
COL + 2 CURDATE
ROW + 2
The COL + 2 command uses relative
positioning, meaning that the current date is displayed two spaces over from
where the "Report
Date"
ends.
4. Under the report date, you want five columns:
Medical Service, Full Name, Medical Record Number, Admission Date, and
Discharge Date. These will be column headings for data retrieved when the query
is run. Enter the following command to
display the text Medical Service:
COL
5 "MEDICAL
SERVICE: "
5.
Write the following commands to display
the rest of the column headers on the same line:
On column 30 display the text: FULL
NAME
On column 60 display the text: MEDICAL
RECORD NUMBER
On column 88 display the text: ADMISSION
DATE
On column 109 display the text: DICHARGE
DATE
ROW + 2
6. Add a command to increment the row
by 2 rows.
7. Add the command to double space after the
columns are displayed. Your HEAD PAGE
section should look similar the following:
Head
Page
COL 5 "REPORT DATE:"
COL
21 curdate
ROW + 2
COL
5 "MEDICAL SERVICE:"
COL
30 "FULL NAME"
COL
60 "MEDICAL RECORD NUMBER"
COL
88 "ADMISSION DATE"
COL
109 "DICHARGE DATE"
ROW +
2
8. Compile your source code and check
for errors. Run the program to see the items added for the Head Page.
9. Review the results. The report
should now show the report title, report date and column headings.

Close the Output window.
10. Save the file, but keep it open for
the next practice activity.
Continue
with the next practice activity.
Detail
In the previous two practice
activities, you created your report title and defined column headers. The
DETAIL section processes for each row returned in the query. Because this section processes multiple times,
you can access each row and write the data from the query to the report.
In this practice activity, add the
necessary commands to display the data from the query to the proper column in
the report.
1. If
it is not already open, open the file 1_<your initials>_MED_SERVICE.prg.
2. Any
fields from the tables in your query or any select expressions you create can
be displayed on the report. After all the commands listed in the HEAD PAGE
section, type: DETAIL
3. You
first want to display the various medical services under that column
header. Scroll up to the SELECT commands
and find the expression created for the medical service. In this example, the expression name is
E_MED_SERVICE_DISP. Highlight the
expression name and press CTRL+C to
copy it.
4. Under
the DETAIL section, write the column command and a number specifically placing
the item directly underneath the MEDICAL SERVICE column heading. Press CTRL+V to paste the expression.
5. After
the medical service is displayed, add the command to increment the row by 1.
6. Compile
your source code and check for errors.
Run the program to validate that the medical service is displayed in the
proper column. If you need to move the
item further to the left or right, go through the cycle of changing the number
in the COL command, compile the source and run the program until the item is
where you would like it. The following
is an example of how data might look on the report:
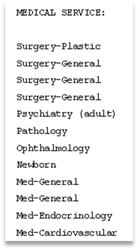
Close the Output window.
7. The
next item to add is the name of the person who is assigned to the medical
person. The data type of the
P.NAME_FULL_FORMATTED is a VC100. When displaying items on the report that have
a data type larger than what you need to display, you have the ability to show
only a portion of that item. To shorten
the name, you will follow the next steps to populate a local variable that uses
the SUBSTRING() function. In the DETAIL
section before the ROW + 1 command, type
NAME
= SUBSTRING(1,30,P.NAME_FULL_FORMATTED)
On the next line enter a column
command and a specific number so the name will be displayed under the FULL NAME
heading. To the right of the number type
the local variable, NAME.
8. Compile
your source code and check for errors.
Run the program to validate the name is now displayed to the right of
the medical service. The following is an
example of the report:
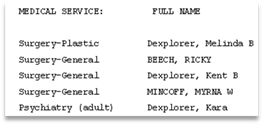
9. Next,
work on the commands to display the medical record number stored in the ALIAS
field. The ALIAS field is a VC200 data type. Of that long string, you only need to display
15 characters. Create a local variable called ALIAS1 and populate the variable
using the SUBSTRING function. Follow the
same pattern used to create the local variable NAME. Add the commands to print
the alias on column 61. The commands
should be placed before the ROW + 1 command
10. Add the commands to display the:
E.REG_DT_TM on column 89
E.DISCH_DT_TM on column 109
Your DETAIL should be similar to the
following:
Detail
COL 5 E_MED_SERVICE_DISP
NAME =
SUBSTRING(1,25,P.NAME_FULL_FORMATTED )
COL 29 NAME
ALIAS1 =
SUBSTRING(1,15,EA.ALIAS )
COL 61 ALIAS1
COL 89 E.REG_DT_TM
COL 109 E.DISCH_DT_TM
ROW + 1
11. Compile your source code and look
for errors. Run the program and validate the specific items are displayed on
each row. The following is an example of
the report:

Close
the Output window.
12. Save your file, but keep it open for
the next practice activity.
Continue
with the next practice activity.
Foot Page and Foot Report
The Foot Page is a section is a
place where items can be displayed on each physical page. This may be where you want to display items
like the page number. It is recommended
to have a matching FOOT for every HEAD.
Since there is a HEAD PAGE section, it is a good idea to match that HEAD
to its corresponding FOOT.
The Foot Report is a section that
processes one time only after all of the other sections have been processed.
This is a good place to display items you want to display one time at the end
of the report such as an End of Report tag. Since there is a HEAD REPORT
section, it is a good idea to match that HEAD to its corresponding FOOT.
In this practice activity, add a
footer to display the page number for each page. Also add text to the end of the
report indicating the end of the report.
1. If
it is not already open, open the file 1_<your initials>_MED_SERVICE.PRG.
2. The
first step in adding the page number to the end of the page is to add the FOOT
PAGE section. Enter FOOT PAGE at the end
of the commands in the DETAIL section.
3. On
column 78 enter the text "PAGE:".
4. To
add the page number, you can reference a reserved variable called CURPAGE that
keeps track of the page number for you. This variable keeps track of how many
pages have been processed and can be used to display the information on the
report. On the next line you will use relative positioning to move over two
spaces from where the text PAGE: ended
and then reference the variable. Enter:
COL + 2 CURPAGE "##".
The variable CURPAGE is an I4 data
type which could potentially be up to 10 digits. When referenced on the report,
the display will contain enough space for all digits even when displaying the
number 1 for the first page. You end up
with a display that would look like the following:
![]()
To control the formatting of CURPAGE
on the report, the Display_Template portion of the Display Options can be used.
Using "##", specifies to only display two digits. Using the display option, the variable
CURPAGE can display up to number 99 and only use up two spaces on the report.
To review the Display_Template
information, refer to the Discern Explorer Wiki Help Pages:
https://wiki.ucern.com/display/public/1101discernHP/Display+Template+using+Discern+Explorer
5. Compile your
source code and check for errors. Run the program and review the results. Scroll down to the bottom of page 1. Do you see a problem? Here is an example that shows the problem of
the page number colliding with an item from the DETAIL section:
![]()
Close the Output window and follow
the next steps to solve the display problem.
6. Adding items
to a FOOT PAGE section can be complicated because you need to make sure you
leave enough room at the bottom the page to write the items you want from the
FOOT PAGE section. You need to add logic to any section that may display items
at the bottom of page to break to the next page if there is not enough room to
write that item and the items in the FOOT PAGE section.
Directly after the DETAIL heading,
add the following command:
DETAIL
IF ((ROW + 2) >= MAXROW)
BREAK ENDIF
This logic checks to see if it is
near the end of the physical page. If it
is within two rows, instead of writing the data, it issues the BREAK
command. This forces the FOOT PAGE to
process, write its data, and then return to the DETAIL section to continue
writing.
Directly after the FOOT PAGE section
heading, add the following command:
FOOT
PAGE
ROW MAXROW - 1
COL 78 "PAGE:"
COL + 2 CURPAGE "##"
This logic will back up one row from
where it currently is and specifies the row to write the items.
7. Compile
your source code and check for errors.
Run the program. Scroll down and validate the page numbers are displayed
on a line of their own. The following
shows an example with the positioning fixed using the solution provided above:

8. Close the Output window.
9.
Lastly, you want to add an End of
Report message at the bottom of the last page. First, after the entire FOOT
PAGE section, enter:
FOOT REPORT
9.
On the next line enter the command to place the text "END
OF REPORT",
towards the middle of the line. Reposition as needed.
10. Compile your source code and check
for errors. Run the report. Scroll down to the very last page and validate the END
OF REPORT text is there. You might need to reposition the text until you get
the item where you want it. Close the Output window.
11. Save your file, but keep it open for
the next practice activity.
Continue
with the next practice activity.
Report Layout
Because there might be multiple
people in each medical service, the medical service is name repeated. 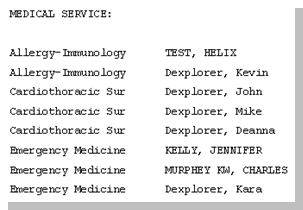
You can improve the readability of
the report by displaying the unique medical service only once. This can be done because this data is logically
grouped by medical service using the ORDER BY.
Using the ORDER BY allows extra sort sections available to use in the
Reportwriter section to help with processing and in this case to display the
unique medical service once.
You also want to display the total
number of encounters in each medical service.
In this practice activity, group
sections and add a total count of patients for each medical service.
1. If it is not already open, open the file
1_<your initials>_MED_SERVICE.prg.
2. Sort
sections enable you to create additional sections on the grid to help group
your data. Because these sections are based on the sort logic (ORDER BY), you
must have a sort clause in your query to use the group section functionality.
This query contains a primary sort on Medical Service that groups all patients
with the same medical service together in the output. In the report you ran in
the last practice activity, the medical service was printed for each row of
data in the report. You can use a sort section to print each medical service
only once. The Sort Sections should be listed in the same order they are listed
in the ORDER BY clause and referenced before the DETAIL section. In the Reportwriter section above the DEATIL
header but below all of the commands from the HEAD PAGE, enter the section
header HEAD E_MED_SERVICE_DISP.
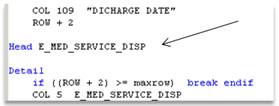
3. Copy
and cut the column command and the column command from the DETAIL section that
displays the medical service:
COL
5 E_MED_SERVICE_DISP
Paste this under the HEAD
E_MED_SERVICE_DISP section.
Add the command to increment the row
by 1. Your section should look similar to the following:
Head
E_MED_SERVICE_DISP
COL 5 E_MED_SERVICE_DISP
row + 1
4.
For every HEAD section you use, you should have a matching FOOT. The FOOT
sections should be listed in the reverse order of how they are listed in the
ORDER BY clause. They follow the DETAIL
section if that section is used. Below
the DETAIL section type:
FOOT
E_MED_SERVICE_DISP
5. Below
the section add a command to increment the rows by 2.
6. Compile
your source file and check for errors.
Run the report and validate each unique medical service is not printed
only one time. The following is an example of the results:
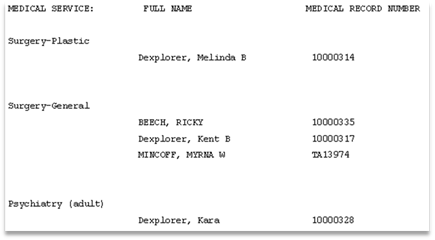
Close the Output window.
7. The Foot MED_SERVICE_DISP section is
used to process items at the end of the logical grouping. Various calculations
based on the group are commonly placed in this section. Statistics such as
total or sub counts, the sum of multiple values, the average or mean of
multiple values, and the standard deviation can be calculated and captured in
the Foot sort sections or Foot Report section. In this case, you already used
the ROW + 2 to double space the rows. You also want to know how many people are
associated with each medical service group.
After the ROW + 2 place the
following text on column 29:
"MEDICAL SERVICE TOTAL: "
On the next line, add the following
command to calculate the number of people in the medical service:
COL + 2 COUNT( E.ENCNTR_ID )
Add a ROW + 2 after the COUNT
command. Your section will look similar
to the following:
FOOT E_MED_SERVICE_DISP
ROW + 2
COL 29
"MEDICAL SERVICE TOTAL:"
COL + 2 COUNT(
E.ENCNTR_ID )
ROW + 2
8. Compile your source code and check
for errors. Run the report and validate the number of people in a logical
grouping are displaying. The following is an example of the results.

Close the Output window.
9. You are finished building the
report!
10. Save and close the file. As you can see, building reports in DVDev can
be tedious because you manually type all of the commands and guess where to
place items. Discern has a tool called
the Layout Builder which is also available to create organized reports. Using
the Layout Builder to create reports eliminates the need to figure out ROW and
COL commands. Instead, you place items
on a section and the positioning commands are created for you!
Layout Builder: Access the Layout
Builder Tutorial under the Use category:
https://wiki.ucern.com/display/reference/Discern+Explorer+Reference+Pages
You have completed the activities
for Building Reports. Return to the Table of Contents of the WBT and
click on the topic, Using the Help File.
Discern Explorer Help
Accessing Help
Since Discern Explorer is a
robust language there is always much more to learn about language. The more
queries you create, the more functions and techniques you want to utilize. Help
is always available when you need it!
Discern Explorer
Help, as well as all of Cerner’s solutions Help Pages, are uCern Wiki pages
dedicated to giving you the information you need to use the solution.
Discern
Explorer Help is organized so there is a main
Home Page and many topics broken down in to different categories, such as
specific application or language information.
Follow the directions to learn ways
of accessing Discern Explorer Main Help.
1. From
DVDev choose Discern Explorer Help
from the Help menu.
If you do not have internet access or the uCern
Wiki is undergoing maintenance, select Click
Here if you cannot view help in the right window. This brings up an offline
version of the Discern Explorer Help files.
2.
You can also access Discern Explorer
Help directly without logging in to the application. Click the link below and
log in using your Cerner log in credentials:
https://wiki.ucern.com/display/1101discernHP/Discern+Explorer+Main+Help
To
have easy access to the Discern Explorer Main Help, create a favorite, bookmark
or short-cut to the page.
The
Discern Explorer Main page you are viewing should be similar to the following: 
Discern Explorer
Help is organized in a hierarchical structure. The Discern Explorer Help Home Page is divided into several broad
topics, which each contain individual topic pages.
Searching in the uCern Wiki
There are several ways to find
topics in the Help. When you click a topic,
from the Main page, that topic is displayed.
If you know exactly what you are searching for, you can use the Search
Wiki bar to help you get to the information you are looking for. Once you are in the topic, you can search for
a specific word or phrase.
When you use the Search Wiki
control, you are actually searching ALL wiki pages. It is helpful to know a few tips to limit
your search to the Discern Explorer Help
pages.
1.
Find the Search Wiki control located
on the top right of the Wiki page:
![]()

2.
In the Search Wiki bar, type CNVTDATETIME and wait a moment to see a
list populate similar to the following:
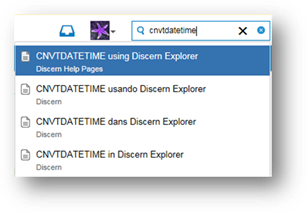
You will see several choices, some
in different languages, some topics from different solutions.
If you are English speaking, it is helpful
to limit your search to English. Many
Discern Explorer topics are followed by the text using Discern Explorer. Entering the word using after your topic limits the list to English choices. If the
topic you are searching for is common to other areas, the category listed below
the topic as Discern Help Pages lists only topics from the Discern Help Pages.
In some versions of the Wiki there
is an option, Only in Discern Explorer Help, which will further limit the list
of topics to that space.
3.
Add the word using to the right of CNVTDATETIME in the Search Wiki bar and
select the first topic. The help page for CNVTDATETIME topic is displayed.
The CNVTDATETIME function is used in
date time qualifications. This might be
a page you visit frequently until the syntax becomes easy to remember.
4.
Navigate back to the Main Home page
by either using the back button or using the following link:
https://wiki.ucern.com/display/1101discernHP/Discern+Explorer+Main+Help
Another helpful feature in the Wiki
help pages is the ability to easily locate a topic in a long document by using
the Find functionality.
5.
In the Search Wiki type SELECT
using and wait for the list. Find
and select the topic SELECT using
Discern Explorer.
This is a comprehensive section
covering all parts of the SELECT command. This section covers many things you
learned in this course and many more topics. You might want to visit this page
often to review different parts of the command.
Sometimes, though, it is important
to get to the specific piece of information you are looking for.
6.
Press Ctrl+F to get the Find window. The Find window displays.
7.
Type Distinct. All instances of
the word Distinct are highlighted and easy to identify as you scroll through
the document.
8.
Click the Next option to scroll through the document and find all instances
of the command.
9.
Navigate back to the Main Home page
by either using the back button or using the following link:
https://wiki.ucern.com/display/1101discernHP/Discern+Explorer+Main+Help
Locate Topics Using Help
Now that you can access and find topics
in the Discern Explorer Help pages, let's make sure you can navigate to a few
common and important topics. In this practice activity, you will locate
information in the Discern Explorer
Help Pages and answer questions.
1.
Reviewing the main page of the
Discern Explorer Main Help, find the main topic that contains:
·
A list of Functions, Control Options
and Commands available to use in Discern
Explorer.
·
Information about prompts, including
the Prompt Builder Tutorial.
·
Information specific to Discern
Visual Developer.
Did you find the Command Reference
section? The Command Reference section provides a wealth of information to
increase the capabilities of your queries and reports.
Did you find the Discern Prompt
Library? If you will be creating queries or reports that utilize prompts, plan
on completing the Discern Prompt Tutorial.
Did you find Discern Visual
Developer Help? This section provides information about the application,
including Tips and Keyboard shortcuts.
2. From
the Discern Explorer Main Help page, click on the Functions link located in the Command Reference section.
3.
Scroll through the list of
functions.
This
section contains a comprehensive list of all of the different functions
available to use in Discern Explorer.
You have been introduced to only
handful of the functions available to use. As you can see, there are many more
functions to learn about and utilize!
4.
Find and click the link for the
function CNVTLOOKBEHIND. Read the definition. Can you think of a usage
for this function?
Yes, you can use CNVTLOOKBEHIND in
place of CNVTDATETIME. You may find the
syntax a little shorter and easy to look back in different units such as
seconds, minutes and hours.
5.
Navigate back to the Main Home page:
https://wiki.ucern.com/display/1101discernHP/Discern+Explorer+Main+Help
10. Select Programming Reference Help in Discern Explorer. You can now see the subtopics relating to programming reference
11.
Scroll through the page to see the
list of topics. Select PLANS and JOINS
using Discern Explorer. The PLANS and
JOINS topic page is displayed.
You learned about Plans and Joins
previously in the tutorial and can review the information whenever you need to
have a refresher on the topic. As a
matter of fact, all topics covered in the tutorial are documented in the
Discern Explorer Help pages!
12.
Do you remember how to place a
single or multiple line comment? From Search Wiki, type Comments using Discern Explorer.
What commands are needed?
13.
Navigate back to the Main page and
click on the main topic, Discern
Explorer System Information Help and then Discern Explorer Security.
14.
What group are users assigned to by
default, Group0 or Group1?
Yes, you are correct; the
documentation tells us that by default, users are set up as a Group1. A user
who is a Group0 can change a Group1 user to a Group0.
15.
Using the Search Wiki, find and
review the description for the function, AVG.
Yes, you can use the AVG functions
to display an average for specified set of values. You might also investigate COUNT, MAX, MIN.
16.
What 3 parameters are needed for the
UAR_GET_CODE_BY? Can you find the
function?
Great!
You are correct; the function needs to have a string_type, code_set and a
string_expression, for example:
SET
F_VAR = UAR_GET_CODE_BY("DISPLAY", 57, "Female")
You have completed the activities for Using the Help File. Return to the Table of Contents of the WBT and click on the topic, Using Explorer Menu.
Using Explorer Menu
NOTE: With the Millennium 2018.01.01
release, Explorer Menu resides in
Discern Analytics 2.0 (DA2). The explorermenu.exe is no longer available,
but the Explorer Menu folder still exists in DA2. Running reports in Explorer Menu
from DA2 is currently available in releases as early as 2012.01.40.
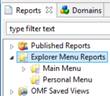
The
following resources can be used to learn all about running reports in Explorer
Menu from DA2:
Discern
Analytics 2.0 Community
Video: Explorer Menu in DA2 for Millennium 2018.01
Discussion: Explorer Menu Deprecated in 2018 Release
Discern
Analytics 2.0 Reference Pages
Configure
Explorer Menu and Discern Explorer Prompt Programs for DA2
Explorer
Menu allows for creating menus, or folders, that contain Discern Explorer
programs you have built with Visual Explorer, Discern Visual Developer, or
Interactive Discern Explorer. You can create folders to logically group
and easily identify Discern Explorer programs. The programs
can be run on demand by selecting them from the menu, supplying the necessary
inputs for the program and running it. The source code is not accessible, only
the object which can be executed as needed. The Explorer Menu also gives you
the flexibility to attach security to a menu, group of programs, or individual
programs to restrict program access to designated users.
Add a Menu and Program
Typically,
programs are located in menus (or folders).
Any program listed under the Main menu can also be placed in a Personal
Menu. The Personal Menu makes finding
frequently run programs by a specific user easy to locate.
In
this practice activity, add a folder for your reports and add programs to that
folder.
1. Open DA2.exe from the Millennium Apps folder. (It takes DA2
time to open. Be patient!)
2. Close the Welcome page:
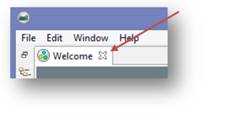
3.
From the Reports tab,
click Explorer Menu Reports:

4. The
Main Menu and Personal Menu root folders are displayed by default. Click the Main Menu to open it.
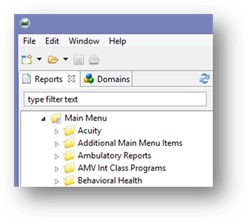
5. You must add programs to the Main Menu before they can be
added to the Personal Menu. To create a folder in the Main Menu section,
right-click the Main Menu folder and
click choose New
Folder. The Create New Folder window
is displayed.
6. You need to add a name and a description for the menu you
are adding. Enter <your initials> My Reports in the Menu Description box and
click OK.

A folder labeled
<your initials> My Reports is displayed under the Main Menu folder.
7.
Add a program to the menu:
A.
Right-click on the
folder and click Add Report.
B.
You want to add the
Medical Service report created earlier in this tutorial (Or any other program
created). Type the name of the object, 1_<your_initials>_med_service,
to see if the object already exists in the Report Name list.
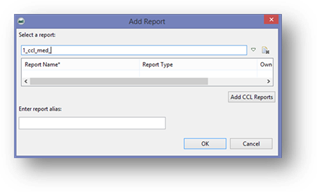
Since this program was
recently created, the program will not be in the list. It is important to check
the list before adding a program to avoid attempting to add the same program
again, which results in errors.
C.
![]() Since the object does not exist, click Add CCL Reports located on the bottom
right-hand side.
Since the object does not exist, click Add CCL Reports located on the bottom
right-hand side.
D.
Enter your 1_<your_initials> in the Program Name box and click the Search button.
E.
Find your object name and click Add Programs. Now your program is
listed in the Reports Name list.
F.
Click on the Report Name,
1_<your_initials>_med_service, and on the bottom left for the Enter
report alias: , provide a “user friendly” report title, such as Medical Service Report and then click OK.
The Medical Service Report is now listed in the folder.
G.
Right-click on the program and
choose Properties.
H.
Scroll down and find the Viewer Mode
property and change it to Discern Output Viewer and click OK.
![]()
I.
Run the program by double-clicking
or right-click and choose Run Report.
Respond to the prompts and run the program.
8. You want to add the Personnel Information
program to Explorer Menu. Follow the
steps listed above to add the program called 1_<your_initials>_PRSNL_INFO, that has a description of Personnel
Information.
9. Now that the two programs have been added to the Main Menu,
you can add them to the Personal Menu.
10.
On the Personal Menu, right-click and choose Add Report.
11.
Type the program name, 1_<your_initials>_med_service.
Select the program from the list and click OK.
The program is now listed in the
Personal Menu and can be run from the Main Menu or from the Personal Menu.
Add Security
You
can limit the number of people who can access this application by using the Explorer
Menu security feature. Explorer Menu Security is set by associating either a
menu or program item to one or more application groups. Only those associated to that application
group can see folders or run the programs.
In
this practice activity, add Explorer Menu security to a report.
1. You
need to add security so only persons who are associated with the DBA
application group can access the Medical Service Report. Begin by right
clicking on the Medical Service Report that you previously added to your My
Reports menu and choose Security.
2. The Application Groups available are listed in
the box on the left. Since you want the DBA position, double-click it (or
select it and click Move).
3. Click OK to
accept. Now the Medical Service Report is only accessible by users associated
with the DBA application group.
Congratulations! You have completed
the last practice activity. Return to the course to access the Performance
Check. You will do GREAT!
Appendix A
Using Data Types Practice Activity
Key
Sample data matched to data types.
__I2___
10
__C5__
CBC
VC100_
Call Dr. Jones when the CBC results are back.
__F8__
12345.00
_DQ8_
12/10/03
Appendix B
Using Field Names Practice Activity
Key
A field that stores the unique
primary identifier of the PERSON table is most likely PERSON_ID.
A field that indicates when an order
was placed would most likely be ORIG_ORDER_DT_TM.
A field that indicates whether a row
is active would most likely be named ACTIVE_IND.
A field that stores a person's last
name in uppercase characters with all spaces and punctuation removed would most
likely be named NAME_LAST_KEY.
A field that stores one
of several numbers that correspond to other data would most likely be named
ORDERABLE_TYPE_FLAG.